
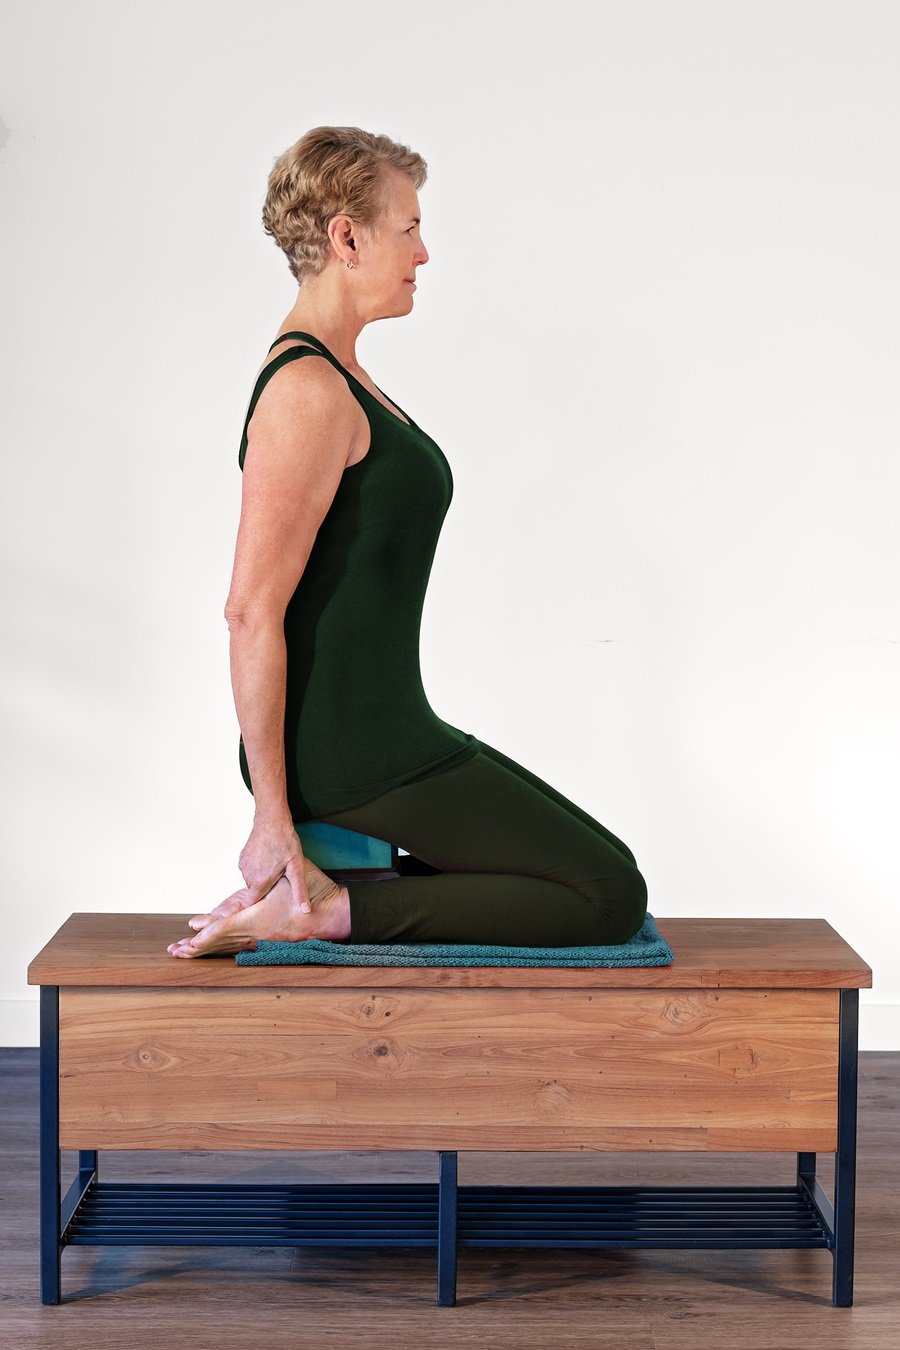
To move into the pose, on an exhale, bring your knees into your belly and lift the feet up, drawing the knees down to either side of the body, as if pulling them toward your armpits. (Photo by Ric Ide)
TO THE MAT
Awakening Your Body From Its Winter Slumber
In yin yoga, holding a deep gentle stretch brings ease
BY JENNIFER SHANNON MAR 26, 2025

Happy Baby is a yin yoga pose meant to be relaxed into. Holding the pose is a way to restore the flow of your qi — or restore the suppleness of your fascia. (Photo by Ric Ide)
Spring brings renewal: it’s a time to embrace the vibrancy of a new season. But as those of us on the Outer Cape know, the transition comes only gradually. As if following nature’s lead, many of us find our bodies are slow to shake off the sluggishness of winter: a stiffness has set in over months of inactivity.
One effective way to ease this is through the practice of yin yoga, based on the Chinese philosophy of complementary principles where yin is the hidden, still aspect of things while yang is all that is revealing and in motion. Yin yoga emphasizes slow poses held for longer times. Happy Baby pose is one in this style; known for its deep stretch and relaxing effects, it helps release tension and improve flexibility.
Before moving into the pose, prepare your space and your body for a relaxing and restorative practice. Place a yoga mat and, if desired, a blanket on the floor. Lie down on your back and draw your knees into your chest, gently rolling from side to side to start loosening up the spine and hips. Think of this gentle movement as the first step in awakening your body from its winter slumber.
Release your feet to the floor with knees bent. Place your hands on either side of your rib cage and breathe deeply into your lungs, feeling your hands move apart as the ribs expand sideways.
Take a few breaths in and out through your nose. Then, try to breathe into your lungs while saving some breath to breathe down into the sit bones, creating a sense of length in your body. Do several rounds of this breathing exercise, then relax your breath and let it return to a normal rhythm.
Now you are ready to do the pose. Take a breath in, and on your exhale bring your knees into your belly and lift the feet up, with the soles of your feet parallel to the ceiling. Take hold of the outside edge of each foot, drawing the knees down to either side of the body, as if pulling them toward your armpits.
There are some ways to lighten this stretch. If you can’t reach your feet, try wrapping a belt around each foot and pulling the straps down. Or wrap your forearms or hands around your thighs and pull down while keeping your feet up. From here, push your tailbone down and away from you to avoid tucking in your pelvis too much. If this feels too intense, try doing one leg at a time. Or do the pose lying on your back, knees bent and feet on the wall. You may feel this in several different areas depending on where your tightness is. It’s targeting stiffness in the back, hips, groin, and thighs.
Once you are in the pose and feel comfortable enough to breathe normally, stay there, holding it for three to five minutes, or perhaps a little less if you are a beginner. Relax as much as you can while maintaining the shape of the pose. Listen to your body. If the pose starts to feel painful or you get numbness, these are signs that you have passed your edge and the pose is no longer beneficial. It should be easy to breathe normally. Come out of the pose and take a few breaths. If it feels right, try it again.
The benefits of holding a pose like this are described both in traditional Chinese medicine theory and in recent research on the role of the fascia in the body.
The traditional Chinese medicine system proposes invisible channels that run though the body — the meridians. When qi — the body’s vital energy — flows freely through them, the body is healthy and balanced. Yin yoga aims to enhance the flow of qi by applying pressure to the connective tissues where the meridians reside. It is by holding the pose, gently tugging the deeper tissues of the body for longer periods, that you are exciting the qi flow in them and nourishing them.
Western scientific research also highlights the importance of fascia, a three-dimensional matrix of connective tissue that envelops muscles, bones, organs, and nerves. “Until recently, this network of tissue throughout the body received very little attention, despite its major role in every move you make,” says the entry on it at Johns Hopkins Medicine. Fascia, once thought to be inert packing material, is now recognized for its relationship to movement, anatomy, and overall health. It is primarily liquid but can become sticky or dry with repetitive motion, inactivity, aging, or illness. Yin yoga’s prolonged poses help restore the fascia’s natural fluidity, reducing pain, stiffness, and physical limitations.
I like to think of blending ancient meridian theory with a modern understanding of fascia as I practice yin yoga poses like this one. It suggests a holistic approach to wellness, one that promotes physical flexibility and mental calm, and to me that makes sense as we slowly reconnect to the energy of spring. It is also useful for anyone seeking deeper relaxation and the feeling of letting rejuvenation arrive slowly.

The Bird Dog Pose is simple, but there are ways to tune into it the balance and focus that let it boost your mood as well as your muscles. (Photo by Ric Ide)
TO THE MAT
A Pose for Defying Chaos
The Bird Dog is for strength, balance, and a mood boost
BY JENNIFER SHANNON FEB 26, 2025
I’ve been thinking lately about what it was that got me interested in yoga in the first place. I remember the first time I went to a yoga class: I had just started college and was feeling anxious about being away from home, my friends, and all that was familiar. A new friend suggested we go, and I don’t remember much more than the fact that I came out of that class with a bounce in my step. My mood was lifted. The experience was more about mind than body.
Yoga became part of my life, and as I continued to practice, I came to enjoy many other benefits, such as greater physical strength, flexibility, balance, and better sleep. But for me — and maybe for all of us — at this time when political chaos swirls with such force, its effect on my mind is the most important one. No matter my state of mind, when I step onto my mat and practice, I feel better afterward.
The Bird Dog Pose — also known as the balancing table pose (or Dandayamana Bharmanasana) — is a good one for countering chaos because it requires three things simultaneously: strength, focus, and determination. When it comes to strength, it targets the core, back, and glutes. It challenges coordination and balance in a way that keeps it interesting for both beginners and advanced students. And it requires concentration: doing this pose, the mind cannot wander, which surely is part of how it boosts one’s mood.
Put down a yoga mat or a blanket to give you some padding under your knees and wrists. For this pose, you’ll start on all fours, in tabletop position: hands under shoulders, knees under hips.
To warm your body up, do a few rounds of Cat-Cow Pose. Begin by rounding your spine up towards the ceiling; let the back of your neck follow the movement of the spine, letting your head drop forward and directing your gaze back. Then begin to move your spine in the opposite direction, softening your belly toward the floor as you arch your back and lift your head, looking ahead and drawing your shoulder blades gently together and down your back.
Add the breath, inhaling as your back arches and exhaling as it curves up again. Go slowly and with ease through several rounds. See if you can feel it move through you like a wave. Now you are warmed up and ready for Bird Dog Pose.
As you return to the tabletop position, engage your core muscles to help maintain a neutral spine — it’s not arched or flexed — and to stabilize your body. If you aren’t sure what that means, try drawing the muscles just below the belly button in and slightly up, then think about tucking your lower ribs in gently. This should create a sense of engagement in the core muscles.
From this steady position, reach your left leg out behind you, point your foot, and rest the top of your toes on the floor. Engage your glutes (the group of big muscles that make up your buttocks) on the left side and use those muscles to lift your left leg until it is parallel to the floor. Check your position: make sure your hips are squared and parallel to the floor and draw your shoulder blades slightly together and down. Now lift your right arm parallel to the floor, and you are in the pose. But there are several ways to really tune into it.
Breathe and feel long from the tip of your right fingers to the tip of your left toes while maintaining a firm sense of balance. Keeping your core engaged will help with that. It also helps to not overarch your lower back. Lengthen the back of your neck, tuck your chin slightly, and gaze down to maintain a neutral neck position. See if you can feel the energy in your body as you hold the pose.
After you’ve held the pose for several seconds, release your arm and leg and come back into the tabletop position, then try the pose on the other side. You can go back and forth three or four times to help build strength. Move slowly and deliberately, maintaining an even breath.
Remember: if any of these movements or positions cause sharp pain or dizziness, those are signs to back off or not do the pose. Yoga is meant to be challenging but not painful.
To challenge yourself further, after extending the arm and opposite leg you can try moving the knee to the elbow under your body.
There are several ways to ease up on this pose. If you are bothered by wrist pain, come up onto your fist rather than a flat hand, or put more padding under your wrist. If you need more padding under your knees, don’t hesitate to do that. If the pose feels a little too challenging in general, you could start by extending one limb at a time. Doing several repetitions and two or three rounds can help to build strength. You may soon notice why this pose is sometimes used to relieve back pain, as it strengthens the glutes and the muscles around the spine.
As you gain strength by practicing this pose, I hope you can use that to maintain balance and that you will feel your ability to stay focused and defy the chaos.
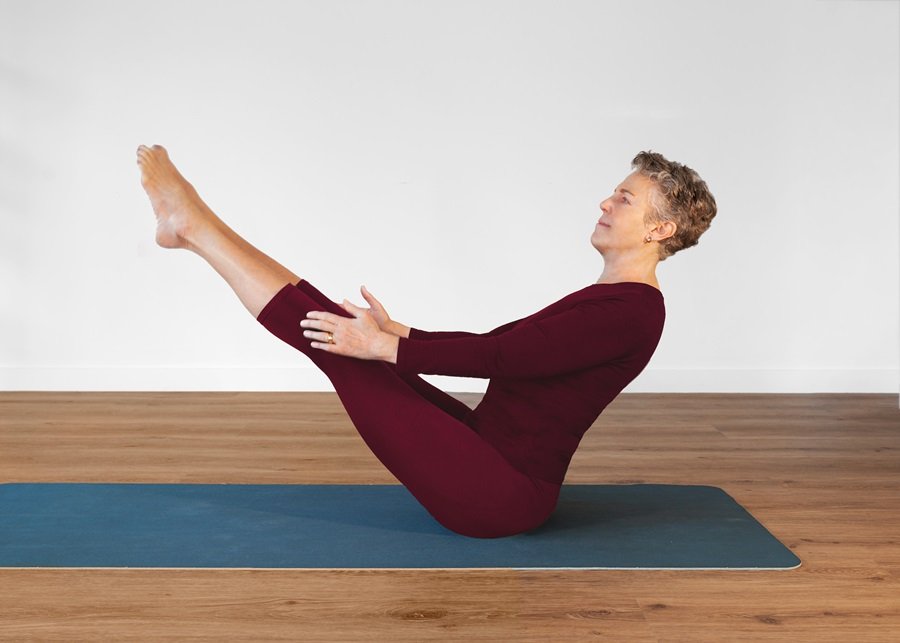
Strength and balance define the Boat Pose. In it, the writer imagines her body as a seaworthy vessel, ready to face the waves courageously. (Photo by Ric Ide)
TO THE MAT
A Seaworthy Boat for Riding the Waves Ahead
Building strength and courage with Paripurna Navasana
BY JENNIFER SHANNON JAN 22, 2025
In setting my intentions for the new year, I have been anticipating the need for strength, endurance, and courage. One vision that keeps coming to mind is the need to build an extra strong vessel in which to ride the rough waves emanating from the inauguration of the era ahead.
Paripurna Navasana, Boat Pose, is just the pose for that. The shape looks like a boat with the arms as the gunwales. The word Navasana combines the Sanskrit words for boat, nava, and seat, or seated posture, asana. Paripurna translates as complete or full, and adding it to the name of this pose brings to mind the image of building a seaworthy boat. This pose dispels my worries and instead engenders a feeling of empowerment. I hope it will do that for you, too.
Boat Pose is a seated balance pose that strengthens your legs, tones the abdominal and pelvic muscles, stimulates digestion and circulation, and develops concentration, confidence, and overall strength. It is not recommended if you have a recent or chronic back or neck injury or if you are pregnant. I’ll offer some ways to support yourself in the pose so you can begin to practice it safely — but they don’t change my advice about finding other empowering poses to adapt (Warrior Pose, for instance) instead of this one if you are pregnant.
Warm up your core before going into this pose. To start, sit on the floor on a mat or blanket. Then lie on your back with your knees bent and place your feet on the mat about shoulder width apart. Lift your lower abdomen slightly, imagining that you are gently lifting your inner organs in and up toward your ribs. Now tuck the lower ribs in slightly and see if this gives you a sense of engaging your core abdominal muscles. Maintain that engagement, roll to one side, and use your hands and arms to push yourself up to a sitting position.
To move into the pose, bend your knees and place your feet on the mat in front of you. Place your hands on the backs of your thighs and hold on firmly as you draw yourself up, lengthening your spine as you draw your sacrum — which supports your spine at its very base — down, still keeping the core engaged.
Now lean back, releasing your hands from your thighs and stretching your arms out at your sides. This may feel like quite enough summoning of your strength and energy. If so, this is your boat pose.
To take the pose further, feel your sitting bones making contact with the floor, and if you’re stable, try lifting one foot off the ground; extend the leg and balance here. If this feels stable, then try lifting the other leg alongside the first. If this makes you wobble or hurts your back or neck, just work toward the pose one leg at a time.
If you are secure with both legs lifted, straighten them so that your legs and torso make a V shape. You will be balanced on your sitting bones with your thighs at a 45-degree angle to the floor. Keep your arms lifted alongside your body. Now see if you can straighten your legs, extending them only as far as you can while maintaining your balance. Your core muscles will be working hard here as you breathe and balance. Concentrate on extending and expanding your boat shape. Breathe as you hold the pose, taking from one to four good breaths, then begin coming out of the pose by lowering your feet to the floor.
Some other supportive options are to lean back on your forearms, palms on the floor, then lift your legs. Or keep your arms extended behind you, hands on the floor for support. Working with either of these options and beginning with one leg at a time will help you build strength.
It is worth considering that the ancient yogis developed the asanas as a way to prepare the body for a long period of meditation. This may sound like something that made sense as part of a relatively stress-free life. But you might look at it this way: they lived in an era when the challenges to basic survival were more numerous and harsher than we face today. They knew the importance of having a strong body, mind, and spirit.
May you embrace the practice of Paripurna Navasana and go out into this year with a sense of strength, endurance, and courage.
When practicing bee breath, covering the ears and eyes is optional. It’s done to promote inner focus. (Photo by Ric Ide)
TO THE MAT
Start the New Year Humming Like a Bee
How Bhramari, a practice of breath control, can calm the mind and body
BY JENNIFER SHANNON DEC 25, 2024
There are lots of opportunities to be as busy as a bee during these winter holidays. As we hustle toward the dawn of the New Year, it can be hard to notice that the natural world is actually suggesting something different for us right now. We’re past the solstice, but the winter still stretches ahead, the days are still short and the nights long. We’re being invited into a quieter, more inner-focused time.
The ancient yogis were all about this inner focus. In India, for example, the Upanishads, the Sanskrit writings that accompanied the development of Hinduism — and alongside it, yoga — beginning around 800 B.C.E., went deeper than earlier texts had into philosophy and questions of being. With the goals of increased inner awareness and higher consciousness, yoga was at that time not yet as focused on the body or on asanas, as it now can tend to be.
But the yogis did develop many practices to try to open the way to those goals. They discovered, for one thing, that the breath could be consciously controlled to produce changes in internal experience. Out of this came breath control, known as Pranayama.
Prana means “life force” and ayama means “lengthening, enhancing, and expanding.” So, the yogic practice of pranayama was used to increase one’s vitality and purify the mind. It is a highly developed series of breathing techniques that involve expanding or holding the breath to bring awareness inward and allow a range of internal states.
Modern medicine has caught on to using breath techniques to influence the mind, the body, and emotions. In my practice as a mental health provider — I was a therapist in my previous career of 30 years — I used to teach my clients a very simple calming breath called “square breathing.” For this technique, you inhale for four counts, then hold the breath to the count of four, slowly exhale for four counts, and hold the breath out for four, then inhale for four counts and begin again. After several rounds of this pattern, most people feel calmer and more able to focus.
Short, shallow breaths come when we’re under stress. This exercise brings the breath into the diaphragm, slowing it down and deepening it. The nervous system responds in kind.
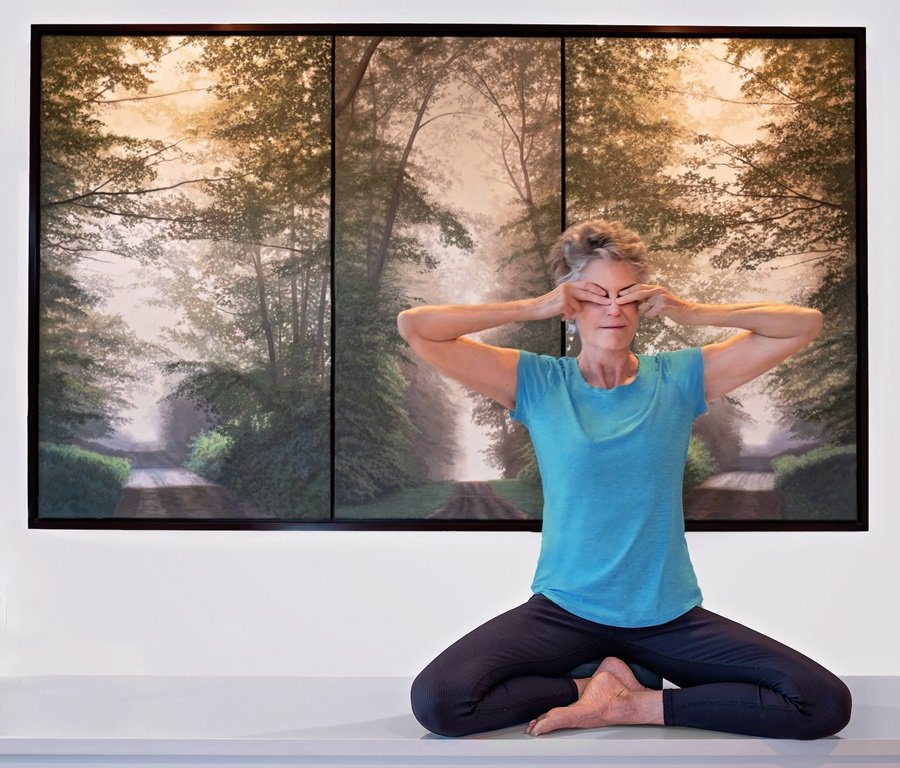
Bhramari, or Humming Bee Breath, adds the element of sound to this soothing process. To begin the practice, sit comfortably in a chair or on the floor in a way that lets you feel your spine long and your body relaxed. Try a few rounds of square breathing to help prepare for Bhramari breath.
Now, press the tip of your tongue to the roof of the mouth. The tongue placement draws energy toward the top of the head. Inhale deeply through your nose. Maintain this tongue position throughout the breathing. Exhale through the nose slowly, making a humming sound — this is the bee part — focused in the nasal cavity.
Pause at the bottom of the exhale briefly. Inhale again and on the exhale repeat the humming sound. You can experiment with making the humming sound high- or low-pitched. It is traditionally done with a higher pitch but see what works best for you. Just don’t force the breath.
As you repeat the breathing pattern several times, focus your mind on the buzzing sound and the silence that follows.
To increase the inner focus, you might try closing off your ears with your thumbs. You can cover your eyes, too, with your index and second fingers, though if this feels claustrophobic, it’s fine to leave your ears and eyes uncovered.
After several bee breaths, pause and see how you feel. The vibration of the humming sound stimulates the vagus nerve. This is the longest cranial nerve in the body and contains the main nerve fibers of your parasympathetic nervous system, which controls your digestion, heart rate, and immune system. Stimulating this nerve with the humming vibration turns on what is referred to as the body’s “rest and digest” response, as opposed to the “fight or flight” response handled by the sympathetic nervous system. When you turn on the parasympathetic nervous system, it helps conserve energy and promotes relaxation of the body.
Bhramari can be a nice way to slow yourself down and prepare for meditation. Or just to help maintain your calm during this time of so many social demands and resolutions. You don’t need a lot of time or even a yoga mat to use square breathing or Bhramari (or both, as I’ve described here) — although if family gatherings and other holiday affairs are what make you want to stop for bee breath, you might want to find a private spot to do your humming.
So much of what happens is outside our control. Humming bee breath counters the stressful feelings that arise from that fact. It’s a small way to control our inner worlds. May the power of the breath help you begin a happy, healthy New Year.

Opening the chest in Locust Pose can be both steadying and energizing. (Photo by Ric Ide)
TO THE MAT
How to Open Your Heart Without Losing Your Mind
The Locust Pose strengthens you to face the stresses of this season
BY JENNIFER SHANNON NOV 27, 2024
For some people, the gatherings and celebrations of the winter holidays might be a welcome relief after an anxious election season. But for most, the winter holidays aren’t necessarily an antidote. They can offer their own special stress. In all, this is an important time to take care of ourselves.
I’ve been thinking especially about the benefits of poses that are what yogis call “heart openers.” The one I have in mind is called the Locust Pose or Salabhasana by most people, although my Kripalu training refers to it as the Boat Pose — a reminder that yoga isn’t precisely standardized.
In the Hindu and Buddhist traditions, the heart chakra is one of the body’s seven energy centers, and opening it is believed to help us feel more connected to one another and to nature.
You don’t have to adopt that philosophy to recognize that this pose opens the chest, where the heart lives, and it can be steadying, energizing, and uplifting. But there’s another way in which this pose, and really yoga in general, can help us: it is good for the brain.
I’ve been reading Dr. Sanjay Gupta’s book about brain health. Gupta is a neurosurgeon and journalist (he is CNN’s medical correspondent), and in his 2022 book Keep Sharp he writes that one of the five most important things to keep our minds “sharp and effortlessly productive” is simply to move. Moderate exercise, Gupta says, is the best kind for the brain. A brisk walk is better for your brain than a cardio workout, for example. So is yoga.
Two other top recommendations for brain health that Gupta talks about and that are very much part of a yoga practice are discovery and relaxation. He discusses the value of staying curious and doing things you haven’t done before. One of the things I love about yoga is that it gets us to move the body in new ways. Every time we practice it is a little different.
Like your body, the brain needs to rest. Relaxation comes with getting enough sleep. It also comes with taking breaks from screens, Gupta writes. Yoga can help with both of those. When you finish a yoga practice, you lie in Savasana, a relaxation pose, for several minutes to allow your body to absorb its benefits. And the Locust Pose involves a gentle backbend that feels especially good if you spend a lot of time slouched forward gazing at your screen.
Exploring the Locust Pose combines movement, discovery, and relaxation for the brain with the opening of the heart. This pose strengthens your back muscles, your glutes, and your hamstrings. It can help to counteract the effects of sitting and improve your posture.
To get into the pose, begin by lying on your mat on your belly and warming up with “windshield wipers”: Bend your knees and lift your feet, then drop them gently first to one side then the other, like windshield wipers. Place your forehead on the ground.
With arms at your sides, stretch your legs straight out behind you, ankles together. Press the tops of your feet and toes into the ground to engage your quadriceps. Rotate your inner thighs up. Then press your arms into the floor and lift your head, chest, and legs. (Two modifications to consider: If you need a lift, keep your hands on the ground by your chest and press into the floor to help you lift your chest. If lifting both legs feels too hard, try lifting one leg at a time.)
Next, let your arms float up, reaching back with your fingertips. Alternatively, you can try interlocking your hands behind you and drawing them down toward your feet as you lift your chest. This helps engage the muscles in your upper back. Either way, draw your shoulder blades down your back and lift your sternum. Keep the back of your neck long by slightly tucking your chin.
Keep the front and the back of the body long so as not to strain your lower back. Don’t focus on how high up you go but rather how much length and space you can create in your spine, sacrum, arms, and legs. Breathe and draw your chest forward as you reach your arms back. See how long you can get. Stay in the pose for several breaths.
To come out of the pose, release your arms, legs, and head to the floor. Turn your head to the side and rest. Give yourself some time to feel the imprint of the pose on your body. May it take you toward the holidays with an open heart and a better brain.
When the world feels wobbly, it helps to call forth your inner Kali. (Photo by Ric Ide)
TO THE MAT
Invoking the Steadying Power of Kali
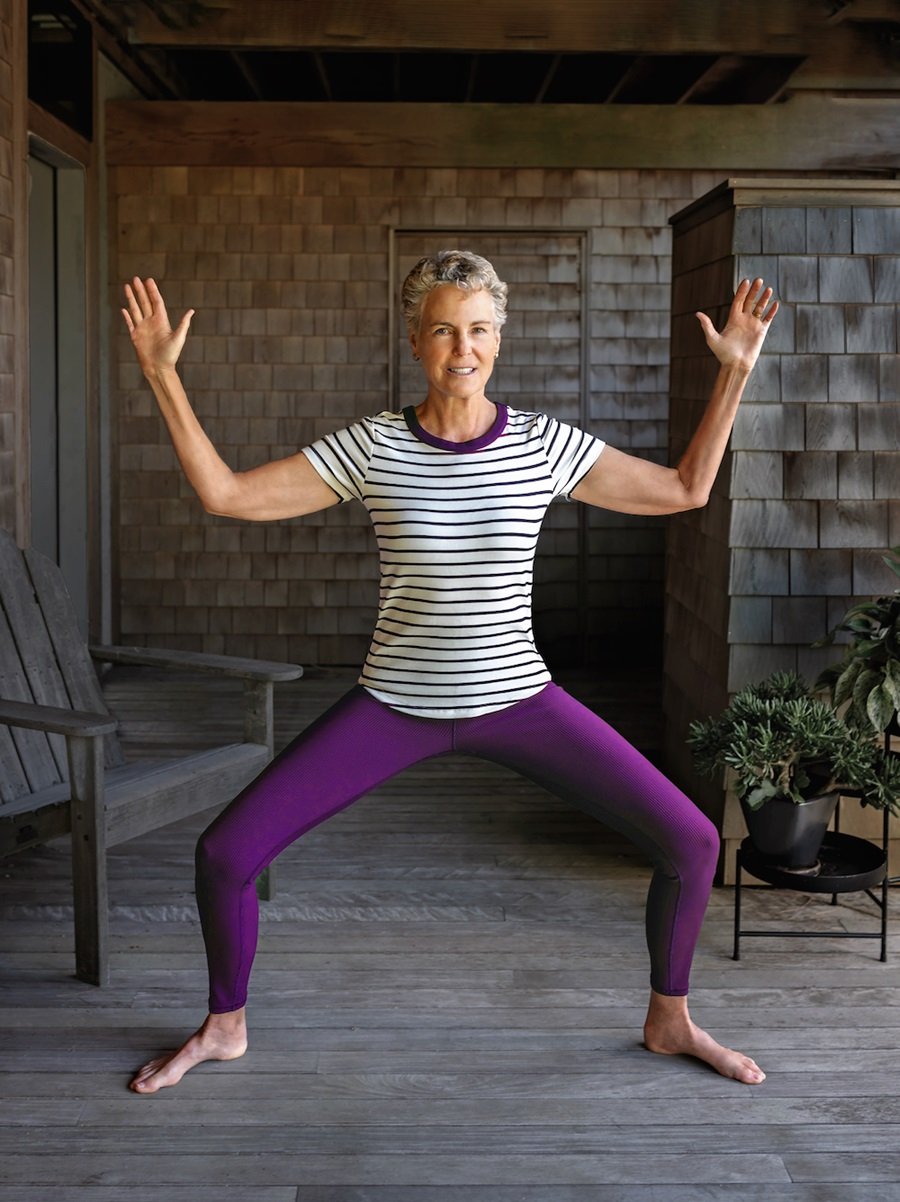
Utkata Konasana is a goddess pose for everyone
BY JENNIFER SHANNON OCT 23, 2024
Whatever your political preferences, if you are paying any attention these days, you are feeling the unsteadiness of this time. Things feel wobbly. At times like this, for me the question becomes: how can I maintain my equilibrium and clarity of mind to navigate this time with compassion and wisdom? I know that grounding myself is the first thing. I turn to Goddess Pose, Utkata Konasana, for that.
The Sanskrit word utkata means powerful or fierce, kona means angle, and asana, of course, means posture — this is a powerful pose. It strengthens the legs and feet, opens the hips and chest, improves concentration, and clears the mind. And in spite of its name, this is a pose that strengthens the creativity and wisdom in both women and men.
We are learning that what are traditionally called “masculine and feminine energies” don’t actually belong to any one gender. We all can cultivate our nurturing, patient, and intuitive capacities, the part of us that is able to think outside the box. And some part of each of us wants to be action-oriented and make things happen through logic, discipline, or physical strength.
The culture in India, where yoga comes from, still generally holds tight to traditional gender roles. But it’s worth noticing that in the realm of their gods and goddesses, females do have great power. In traditional tales, feminine power is often used to bring things back into balance, to right wrongs, and to heal wounds both physical and social.
The Hindu goddess Kali is depicted as a fierce warrior who symbolizes the strength and power of the feminine side. She is said to have fought off demonic forces to restore justice and peace to the world, and ancient legend has it that after she fought off one particularly demonic figure, Samba, the Earth calmed, the oceans receded, the dark clouds parted, and the sun shone. Goddess Pose is said to invoke the goddess Kali.
To call forth your inner Kali, start by standing in the center of your mat or on another nonslip surface and place your feet three to four feet apart. Turn your feet out at about 45-degree angles. Raise your arms to shoulder height, hands up, fingers pointing to the sky — this is Cactus Arms. Now draw your shoulder blades down your back.
Take a deep breath in and as you exhale bend your knees coming down into a plié or squat. The classic pose is a deep squat with the thighs parallel to the floor, but your pose doesn’t have to be that deep. Your pose depends on your flexibility and strength. To explore your range of motion, go up and down a few times. Draw your tailbone down toward the floor to prevent overextending your lower back. Find a spot where you can stay without too much discomfort.
Here, take the time to be in the pose. Open your chest by lifting the sternum and drawing in the lower ribs. Be sure to maintain a long and straight spine. Lift the muscles below your navel in and up slightly to engage your core. Lift out of your waist. Keep your knees open. The tendency is for the knees to drop forward, but you want to keep them in line with your toes.
If you are having trouble balancing, you can practice this pose standing next to a wall. Keep your arms active, but if the cactus arms position is too hard to hold, you may put your hands on your hips or in front of your chest in Prayer Pose. Imagine your head is like a helium balloon floating up as you keep the back of your neck long. Hold the pose for three or four long easy breaths (you can always go longer or shorter as needed).
To come out of the pose, straighten your knees and heel-toe, heel-toe your feet back to hip width apart. Relax your arms at your sides. Notice how you feel. Each yoga pose will create a resonance in your body. Tune in and feel yours. May you receive the power of Kali to clear the dark clouds and restore peace to the land.

Child Pose is a pose of surrender and acceptance. (Photos by Ric Ide)
TO THE MAT
A Pose to Welcome Change
Yoga for a time of starting over
BY JENNIFER SHANNON SEP 11, 2024
Let’s all take a deep breath in and let a big sigh out. With summer behind us, we begin to welcome the fall — to me the most beautiful time on the Cape. With this transition comes the chance to slow down and give your body, mind, and spirit a chance to shift gears.

Despite offering restfulness, Child Pose is not necessarily easy. Here, the writer uses a pillow to raise her hips and folds her arms under her forehead.
Yoga offers a pose to help you do this. In Sanskrit, it is called Garbhasana, which refers to the embryo, and while there are several variations to explore, this one, familiar to many, is also known as the Child Pose. It represents returning to something primal, starting over, tapping into our original essence. It is a pose of surrender and acceptance.
To prepare for Child Pose, you will want some padding underneath you, because this is a pose to settle into. Stretch a yoga mat and or a blanket on the floor. Move into a tabletop position: knees under hips and hands under shoulders. Spread your fingers wide apart, hands pressing into the floor. If your wrists are sensitive, you can keep your hands in fists or come up onto your fingertips, making a tent shape with them.
Take a few breaths and allow yourself to arrive in the pose. Place the tops of your feet on the floor. Think about being long from your tailbone to the top of your head. Sit back onto your heels. Your torso extends over your thighs and rests on them. Your arms remain extended and relaxed on the floor in front of you. Rest your forehead on the mat.
Despite being a restful pose, Child Pose is not necessarily an easy one. It can be challenging for the knees, hips, and ankles and is not recommended for anyone who has an injury or chronic pain in those joints. If you have uncontrolled high blood pressure, proceed with caution and place a pillow under your forehead. I tell my yoga students that no pose should cause sharp pain, electrical sensations, or numbness. You should be able to breathe normally, feeling a good stretch but no pain. Think about giving 70 percent of what your body can do.
Child Pose intensely stretches and stimulates the body. There are several adjustments you can do to make it friendlier.
If you place a pillow under your buttocks, it will raise your hips and put less stress on your knees. You may also want to support the front of your body with some stacked pillows, blankets, or a bolster to help your spine stay long. If this still proves to be too stressful for your knees, try widening them. In this wide-leg Child Pose, you may feel a stretch in your inner groin. Some people find Child Pose painful in the ankles; to alleviate stress there, roll up a small towel and place it between your ankles and the floor.
There is an alternative to try if these adjustments leave you still too uncomfortable. You can go into the pose lying on your back and drawing your knees into your chest with your hands. Pay attention to the position of your head and neck. Is your head cocked back, chin pointing up? If so, place a folded towel or blanket under your head to relax your neck.
Or try the pose while sitting in a chair: with feet on the floor, bend forward between your knees, putting your hands on the floor or on blocks.
In whichever variation you have chosen, take an easy flowing breath in and out. Stay with the pose for a minute, or more if it is comfortable. Allow your body to absorb the restful benefit of the pose.
To get out of the pose while lying on your back, you may roll to one side and use your hands to push up. To come out of the standard pose, bring your hands back under your shoulders and push yourself back up into the tabletop.
Now, lie down on your back and tune in to the resonance of your own body. Stay for as long as you like. In addition to recentering the mind, Child Pose relaxes the muscles of the lower back, and because it increases blood flow to the abdomen it can improve digestion. When you are ready, stand up slowly — you may experience some lightheadedness if you transition too quickly.
Take note of how your body feels now. In this busy, productivity-oriented world, it is a revolutionary act to take the time to rest and restore our bodies and minds. Doing so will ease your transition into fall.

In restorative yoga, props are used to support the body and help you relax more deeply. (Photo by Ric Ide)
TO THE MAT
Using Yoga to Recharge
How to gain energy by spending 20 minutes in a basic restorative pose
BY JENNIFER SHANNON AUG 7, 2024
This is a strange time of year, when we are supposedly in more relaxed modes and keeping more relaxed schedules. But for most of us it’s a busy time, and we worry about running out of steam — forgetting that there is something we can do to restore our energy: rest.
Restorative yoga is designed to help us do just that. This approach to yoga involves supporting the body in various poses that promote deep relaxation. There you’ll find the kind of rest that allows the mind and body to heal and rejuvenate. You can benefit from these poses whether you’re an active person, tired from intense exercise, or someone who spends your days in front of screens.
For this style of yoga, you go into a pose with lots of supports to make your body comfortable. Then you give your body time in the pose. That’s what allows your nervous system to settle down and switch into the parasympathetic state. Sometimes referred to as “rest and digest,” this is part of your autonomic nervous system, which takes care of many functions that you don’t have to think about to control. Activating it helps promote healthy sleep, digestion, and physical relaxation.
The restorative pose I will explore here is the basic relaxation pose with legs on a chair. It can be done by almost anyone, but it is not recommended if you are more than three months pregnant.
You will need a quiet room and a few props: a chair, two blankets, a towel, an eye bag (an eye mask or any soft cloth will do), and a clock or timer — the idea is to remain aware of time and not simply fall asleep in the pose.
Begin by setting up the chair in front of you and laying the blanket perpendicular to it such that it will cushion you when you lie down and put your legs up on the chair seat. Start with that: lie down on the blanket and place your lower legs on the seat. Your legs should be more or less parallel to the floor. The legs should feel supported; knees and hips are bent and should feel relaxed and comfortable. You may need to adjust the height of the chair seat to accomplish that.
Now, take your towel and roll it up just enough so you can slip it under the natural curve of your neck to allow your head and neck to feel supported. It is meant to put the neck in a neutral position, with the back of the neck long, supporting the natural curve of the neck. Tucking the towel under the back of the neck and tucking the chin slightly should feel like it eases strain in the neck and shoulders.
When you are comfortably settled, lay a folded blanket or a lightweight sandbag on your abdomen. (Sandbags are yoga props that are used to add gentle weight to support poses, but you can get much the same effect with a folded blanket.) If you’re in a cool room and would like an extra blanket for warmth, lay that over yourself now. Let your eyes relax and cover them with an eye bag or anything that blocks the light and does not chafe. I sometimes use a favorite soft T-shirt.
Covering your eyes is important: light stimulates the brain and right now you want to help the brain and mind settle down. But if you find covering your eyes very uncomfortable, do what you can to lower the light in the room where you are practicing. Sound can also be stimulating, but some people find listening to soothing music enhances their relaxation. To each her own.
Let your arms rest at your sides, far enough from your rib cage to allow them the space to relax fully. If your arms or shoulders are not comfortable extended like this, you may need to support them by placing additional towels or blankets underneath the length of the arm and hand.
The covering of your abdomen can feel odd at first as the layers of tension release. Breathe and give it time; the weight will help your abdomen soften. As the abdomen relaxes, so does the lower back.
Now swallow and soften your jaw, let the root of your tongue get heavy, and release. Soften your eyes. Let your legs roll out. Allow your back body to feel the support of the floor as if you were being held by the Earth.
As you begin to let down in the pose, you may notice your body feeling lighter. Now is a good time to add a centering breath to your practice: Take a long easy inhalation, followed by an equally long exhalation, through the nose if possible; repeat two or three times, then follow with several cycles of your regular breathing rhythm. Repeat the centering breath pattern being careful never to force your breath. If at any time you feel dizzy or uncomfortable, release your breath and just breathe naturally.
Remain in the pose for 5 to 20 minutes.
When you come out of the pose, move very slowly. First remove the blanket or sandbag and your eye covering. Bend your knees and roll to one side, resting there for several breaths. To sit up, press the floor with your elbow and use the palm of your other arm to push yourself up. Remain seated for a few breaths.
Close your eyes and notice what you have cultivated in this pose. It relaxes the muscles and organs of the abdomen as well as the lower back. Restorative poses may help to lower blood pressure and reduce fatigue. Later you can note whether it has helped you sleep better — in that way doubly refilling your energy bucket.

Ustrasana with a chair for more support for the neck and back.
TO THE MAT
A Yoga Pose for Finding the Joys of July
Ustrasana, in case the crowds annoy you
BY JENNIFER SHANNON JUL 10, 2024

Arching from the upper back and lifting the chest can help open the heart chakra. (Photos by Ric Ide)
All the pleasures of summer are upon us. And so are the crowds. If you’re one who really loves the hubbub, lucky you. But for many of us drawn to the quiet here, it can be challenging to stay open to the joys of July.
One yoga pose that can help is Ustrasana, or Camel Pose. It is said to open the heart chakra. In the ancient system of the yogis, chakras are believed to be energy centers; located along the spine, they are responsible for the different kinds of energy we have. The energy in the heart chakra is directly related to our being able to feel love and connection with ourselves and others. If it is undernourished, we can feel irritable, judgmental, and antisocial.
This is an advanced pose in its fullest expression. So, I do not recommend going right into it. Begin instead with a Cat Cow Pose to warm up your body and proceed very slowly from there.
For the Cat Cow Pose, start on all fours in a tabletop position, with knees under hips and hands under shoulders. Put some padding under your knees and maybe your wrists, too. You can move your hands out ahead of your shoulders to decrease the pressure on your wrists. Or just make fists with your hands.
Take a long slow inhale and draw your belly button down toward the floor. Think of a cow’s big belly extending low to the ground. As you arch your back, your tailbone points up and you look forward, keeping your neck long. Then, as you exhale, curve the back up like a Halloween cat. Tuck your tailbone under and look back toward your feet. Go up and down slowly several times, breathing and following the movement of the spine with your mind’s eye. See if you can articulate each vertebra as you move.
To move into the Camel Pose, start in a kneeling position, knees hip width apart. From there, draw your tailbone down toward the floor while lengthening your spine, lifting up out of your waist and engaging your core by drawing the muscles below your navel in and up. Tuck in your lower ribs. Place your hands on your lower back, fingers extending down to your buttocks, as if you were sliding them into your jeans pockets.
Now, imagine there is a bar just at the bottom of your shoulder blades. Lengthen your spine and lift up and back over the bar. Keep your core engaged. As you arch back, imagine a beam of light shooting up toward the sky and lifting the center of your chest. Roll your shoulders back and down away from your ears. Breathe deeply.
Check how you feel now. Pressing your shins and the tops of your feet into the floor can help with the lift. Keep your core engaged. Do not stick your belly out. Keeping your neck long, tilt your head back, but tuck your chin in. If you have neck problems, keep your head in a more neutral position. For extra support, you can do this pose with your feet at a wall and, as you arch back, let the wall support your head.
Backbends come from the upper part of your back, the thoracic spine, not from the lower part of the back, or lumbar spine. By imagining that pole just under the bottom of the shoulder blades, you can keep the arch in the proper place. Do not think of this as a competition to see how far you can go. Ustrasana is about exploring your edge and opening your chest safely. Think about keeping the front and the back of the spine long as you move into it.
If you want to explore a bigger opening, try tucking your toes under and reaching back to hold your heels as you lift the chest. You could also place yoga blocks at your ankles and reach back to them. You can understand why it is called Camel’s Pose: the arch is like the hump on a camel.
At whatever place in this pose you find friendly for your body, take long deep breaths into your chest, holding the pose for a few seconds or as long as 30 seconds. To come out of it, return to tabletop and rest.
If it is not comfortable for you to kneel, or you want more support for your neck or back, you can do this pose sitting in a chair. Pick a chair with a back that reaches to about the height of your shoulder blades. Cushion the back of the chair by draping a towel or blanket over it. Sit with your feet hip width apart, take a deep breath in, and reach your arms back to grasp the sides of the back of the chair. Lift your chest and get long in the front and the back of your spine. Imagine that sunbeam coming out of the center of your chest, lifting your sternum.
Keep the back of your neck long. Tilt your head back and tuck your chin slightly toward your chest. Take a few slow full breaths. Release the pose by pressing your hands into the seat of the chair and sitting up. Again, after the hubbub, rest.

The writer’s teacher Karin Stephan says, “Getting into the pose is the pose.” (Photos by Ric Ide)
TO THE MAT
Natarajasana Is a Dance for Summer
Getting into a groove with June and maybe the whole universe
BY JENNIFER SHANNON JUN 12, 2024
After all those quiet months, suddenly there is so much to do. June’s arrival on Outer Cape Cod can make a person feel scattered. That is why this month I’m turning to Natarajasana, Dancer Pose or Lord of the Dance Pose. It is all about balance and focus.
Natarajasana engages the body in several ways. It strengthens your legs and ankles, opens your hips, and stretches your shoulders and chest. It’s a standing pose and a backbend. It symbolizes a connection to the Hindu god Lord Nataraja, the King of Dance and one of the eight forms of Shiva, the creator and destroyer in Hindu philosophy, who represents the cosmic dance at the source of everything in the universe.
Even if you’re not into yoga philosophy, doesn’t June — this time of green growth and blossoming — just make you want to dance? Yet this pose can look intimidating. I encourage you to join this dance step by step, trying the pose in stages, and going only as far into it as you are able, keeping in mind, as always, that yoga is not meant to be painful.

Natarajasana is also called the Dancer Pose. Doing it is a way to cultivate the balance and focus needed for summer if you live on Cape Cod.
First, you will need some props to get comfortably into the Dance Pose: a chair or wall to lean on, a belt, and a yoga mat or other surface that is not slippery to stand on.
I recommend you warm up before doing the pose with some gentle movement and breathing. If you haven’t kept doing it, you might revive the “empty coat sleeves” warm-up I wrote about last June: Stand with your feet wider than your hips and let your arms hang loose; begin to swing them from side to side, turning at the waist, relaxed and easy. Twisting back and forth, get a relaxed rhythm going. Add some intentional breathing by inhaling to one side and exhaling to the other. Feel your body start to let go, your breath open. Do this for 30 seconds or so.
Stand in Tadasana, arms at your sides, feet about hip-width apart, feet parallel. Yes, we are still only just getting into the pose. Take your time. Feel your feet on the floor. Imagine you are growing roots down into the floor and feel how it grounds you.
Imagine you are heavy, like a sandbag, from the waist down, and that from the waist up you are as light as a feather. Your spine is like a string connecting your head, which floats up above you like a balloon. Relax your shoulders.
From here, finally, you can move into the pose. Be sure to have a chair or wall within reach to lean on and help you balance. Bend your right leg, bringing your right heel toward your buttocks. Take hold of your right ankle with your right hand or use a belt or strap if you can’t reach your ankle. Bring your right knee in line with the left knee. Align your hips.
Now bring your focus to the left leg. Press into your left big toe mound and tighten the muscles above your left knee. This will help stabilize your left leg. Engage your core by lifting the muscles just below your navel in and up, at the same time tucking the lower ribs in and knitting the ribs together.
Keep this alignment in your hips as you begin to lean forward and at the same time draw your right thigh back and up. Pick a spot on the floor in front of you or on the wall and fix your gaze on this point. This is called a Drishti point. It will help you to gather yourself and concentrate. If you’re steady, try letting go of the chair and lifting the left arm up and forward in front of you. Lift from your shoulder and upper arm as you extend through your fingers. If you are using a wall to balance, you can move your arm up the wall.
Take a few breaths. Release your right leg to the floor and return to Tadasana, standing on both legs, arms at your side. Try the pose on the other side. Take a few breaths and notice how you feel.
Moving slowly into this dance with June and the cosmos, I think of one of my teachers, Karin Stephan, who lives in Cambridge now but studied with B.K.S. Iyengar in India. I can hear her voice repeating something she often says: “Getting into the pose is the pose.”

There are many ways to practice Supta Padangusthasana, a pose that offers relief to hamstrings, back, and hips. (Photo by Ric Ide)
TO THE MAT
Reach for Your Toes
You’re not too stiff to do yoga. You just need a little time in Padangusthasana.
BY JENNIFER SHANNON MAY 8, 2024
If I had a nickel for every time someone has said, “I can’t do yoga because I’m not flexible,” I’d have enough for a trip to Kripalu. You do not need to deprive yourself of the soothing, calming effects of yoga on your body and mind just because you think you are too stiff. Flexibility is something you can develop over time.
While each of us has a unique bone structure and body condition that may limit our ability to open up in a particular pose, yoga allows for adaptations that give us ways to benefit from most poses.
Yoga is about optimizing the health and welfare of your body, mind, and spirit. To do that, you simply have to start where you are.
Supta Padangusthasana is an example of a pose that might seem impossible at first. Supta means supine, lying down. Padangusthasana means big toe. This is the Reclining Hand-to-Big-Toe pose.
There are many ways to experience the substantial benefits of this pose. It can be done lying on the floor, lying on a bed, or even sitting in a chair. And you can use a strap to help you reach your big toe safely — or if you don’t have a yoga strap, you can use a bathrobe tie or a long cloth belt.
Fundamentally, this pose allows you to open your hamstrings. But since everything in the body is connected, you will likely feel benefits in other places, like your back, ankles, and hips.
Start by lying on your back. You may lie on the floor with a mat or blanket as cushioning, or you may do this pose lying on your back in a bed. (I will explain the chair option after describing the supine version.)
Extend your legs straight and flex your feet. Stretch your legs long, reach your arms overhead, on the floor, and stretch them long as well; then release your arms to your sides. You are looking for a feeling of length while at the same time maintaining the natural curves in your spine. To know if you are maintaining those natural curves, try sliding your hand under the small of your back. Allow a little space there.
Now move your left hand onto your left thigh. Bend your right leg and lift your knee toward your head. Take the strap and loop it around the ball of the right foot. Most of us can’t straighten our leg while grasping the big toe. We use a prop, the strap or belt, to help us adapt the pose. From here, straighten the right leg toward the ceiling.
Think about your form for a moment. Use your left hand to keep the left leg stretched out along the floor. The left foot should be in line with the left hip and should be flexed. Both legs are engaged. Keep your body grounded by pressing the left thigh into the floor while maintaining the natural curve of your spine.
If you feel lower back pain, try keeping the left leg bent with your left foot on the floor. Another adaptation would be to put your left foot up against a wall, pressing the foot into the wall to anchor and stabilize you.
If you practice this pose regularly, you may find you can eventually straighten the left leg on the floor. Patience, persistence, and regularity will pay off — but there is no need to push it. It is likely that you will not be able to have your right leg completely straight at first. Or you may not be able to flatten the left leg on the floor. As you can see in the photo, my left thigh is above the floor. This pose for me is a work in progress.
Once you have held the pose for a few breaths on the right side, release your foot from the strap and straighten both legs along the floor. Your right leg may now feel longer than the left. Repeat the pose raising your left leg. Go back and forth, holding each side for a few breaths.
Repeat this up to three times on each side, then stretch out on the floor and see how you feel. Do you notice any difference?
If you find it hard to work from the floor or your bed, try this pose sitting in a chair. Sit up straight with both feet on the floor and the strap in hand. Loop the strap around the ball of one foot and stretch the leg out in front of you, holding the belt in both hands. Straighten the leg as much as you can and keep the foot flexed. Hold the stretch for a few breaths, then switch sides.
One of the big benefits of yoga is that it increases our body awareness. That will come as you take a few breaths after holding a pose to notice what you are feeling. Do you notice a greater sense of ease in your body? Or maybe a calmer state of mind? If not, maybe you are pushing yourself too hard as you do the pose.
Try doing less, stretching less. Pushing is not a part of yoga. The esteemed teacher B.K.S. Iyengar, who introduced yoga to the West in the 1950s, famously advised: “Nothing can be forced; receptivity is everything.” Find your edge and then back off. The edge will change with practice.
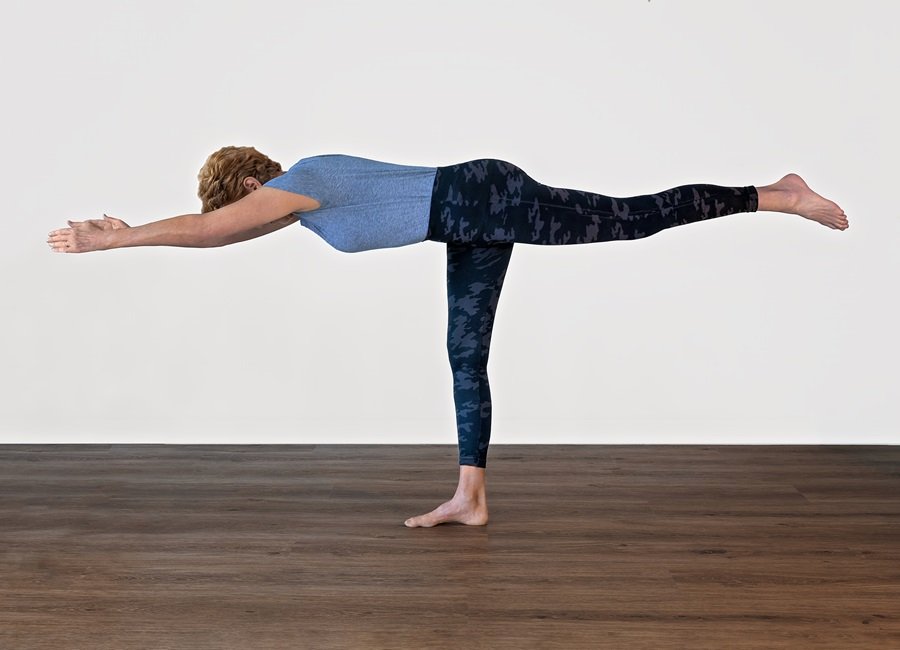
The writer, balanced in the Warrior 3 pose, stretches both arms forward and one leg back while the other remains firmly planted. (Photo by Ric Ide)
TO THE MAT
Gentle and Slow Is the Path to Warrior 3
Strength, balance, and orientation in space are benefits of this challenging pose
BY JENNIFER SHANNON FEB 7, 2024
Strength, balance, and fortitude. These are surely the qualities a person who is pursuing a spiritual path would need. But it seems to me they are also important qualities for anyone living in our times.
Virabhadrasana III, also called Warrior 3, is a yoga pose that focuses on developing these capacities. Most everyone finds it challenging. So much so that considering the many ways of supporting yourself and adapting the pose to make it more friendly for your body may be more important than actually winding up in the pose. I love this about yoga.
A yoga practice is about being on a path, not getting to a destination. You start where you are and adapt the poses according to your needs. Along the way, you build strength and skill. It is a learning process — physical, psychological, and spiritual — about yourself and about life. Which is why having a regular practice is so important.
When I was younger, I injured myself several times doing yoga. In my exuberance, I would push myself beyond my limits, and it took me years to begin to listen to my body and let it guide me. Only then did I learn that I could get the benefits of the poses by going more slowly and working my way in over time, and that, in the end, perfection was not the goal. A good life lesson.
Yoga teaches us to be real about who we are and to grow with wisdom and compassion. So, slowly, let’s see what there is to learn in Warrior 3.
Begin by standing at the back of your yoga mat.
Stand in Tadasana or Mountain pose, with your feet parallel, hip-width apart. Feel your body extending upward as your arms extend down by your sides.
Take a deep breath and step your right foot forward 3 to 4 feet. Bend the right knee, keeping it aligned over the ankle. Turn your left foot out 45 degrees as the right foot continues to point straight in front of you. Exhaling, draw your right hip back, bringing your hips parallel to each other.
Raise your arms, energizing them to lift you out of your waist.
Press down into your right foot and engage your core by drawing the muscles a few inches below your navel in and up. Tuck in your lower ribs.
Come up onto the toes of your back foot. Begin to shift all your weight into the front leg as it straightens. The arms and the body reach forward parallel to the floor and the back leg comes up in line with them. Be careful not to over-straighten your standing leg. You don’t want to lock the knee and put strain on the joint.
Think stability. Now that you’re in the pose, there are several things you can do to stabilize yourself here. Engage the muscles of your right outer hip but keep your hips in line with each other. Keep your head between your arms, the crown of the head reaching forward as the arms and hands reach out in tandem. Your hands face each other. Keep your core active and direct your tailbone towards your left heel.
Try expansion. Reach your arms and your extended leg in opposite directions. At the same time, feel your standing leg and foot extending to the floor, grounding you. This takes focus and concentration. Now repeat the pose on the other side.
For many people, balancing on one leg like this is not possible. So how to be on the path to this pose? There are many ways to adapt Warrior 3 so you can build strength and get its benefits of it without losing your balance.
One way to support yourself into this pose is by doing it with two yoga blocks standing on end in front of you like two little pillars. Instead of stretching your hands out in front of you, bend forward and place your hands on the blocks. Proceed with the pose from here. You’ll also find this version easier on your shoulders and arms.
Another approach is to place a chair 3 or 4 feet in front of you with the back of the chair facing you. Hinge forward at the hips and take hold of the back of the chair as you lift your back leg. You can also do the pose using a wall for stability; place your hands on the wall or, if you’d rather, rest your back foot on the wall.
For a gentle start, you could also begin in a tabletop position, on all fours, rather than standing. Place a blanket under your knees for cushioning and practice lifting one leg behind you at a time, raising it up to hip height. As with the standing pose, keep the hips in line with each other. Then try lifting one leg and the opposite arm. Now you’re building balance and strength. Be sure to use your core just as you would if you were standing.
Getting into this pose, you can feel how it strengthens your legs, ankles, and feet, and your core, shoulders, and back. But there’s something else about it that isn’t so much about the parts of your body but about your sense of it. In that way, it strengthens your proprioceptive system, which keeps you in balance and oriented in space.
Be gentle with yourself and go slow as you let your body be rooted and yet expansive at the same time. It’s only February, after all — you’ve got half a winter ahead for exploring this path.

Legs and arms are stretched, the core is engaged, and the whole body is grounded in the Cow Face Pose. (Photos by Ric Ide)
TO THE MAT
Gomukhasana Summons the Sacred Feminine
In the face of cosmic chaos, be nurtured by a cow
BY JENNIFER SHANNON JAN 10, 2024
The idea of the sacred feminine goes back through ancient history. It’s also an idea I’ve been thinking about a lot in relation to the anxiety so many of us feel when we consider the big challenges of collectively caring for our democracy and our planet.
In the mythology of India, which is intertwined with yoga, the cow is revered as a symbol of divine feminine energy. Hindu legend has it that Mother Earth herself took the form of a cow to escape the chaos the world was thrown into when a greedy, power-hungry king, Vena, took control of the world.

Sitting on a block makes the cross-legged position that undergirds the pose easier.
He banished activities that didn’t benefit him directly. He did not care what toll he took on the environment or on other people as long as he got what he wanted. He even forbade the sages from performing the sacred rituals that upheld the rhythms of the cosmos. Without them, the whole atmosphere of the world began to sour: the earth became dry, crops failed, and the air became hard to breathe.
Mother Earth was so distraught she turned herself into a cow and ran away. Without her, the planet was doomed to utter deterioration. Vena did not care as he sat in his castle eating fast food and spouting lies. But finally, the sages rose up and slew him. He was replaced by Prthu, who realized that he had to appeal to Mother Earth to replenish the planet.
She trotted away when he found her, saying she would not come back to be abused. But Lord Prthu told her that if she would consent to be milked to replenish the world, he would declare all cows sacred forever. She agreed, and through her divine nurturance, the world was returned to a healthy state.
It seems timely to practice a pose named after the cow — Gomukhasana translates as Cow Face Pose — to summon some needed divine feminine energy. It is considered a deeply nurturing pose.
You might also think of it this way: in doing the pose, your crossed legs take the shape of a cow’s smile, and your elbows are like a pair of cow’s ears, one pointing up, the other down.
The pose involves stretching, softness, and grounding. By opening the shoulders, the hips, buttocks, and quadriceps, it may help counteract long periods of sitting.
There are a few contraindications to Cow Face Pose. Go easy if you have shoulder or knee pain or injuries, or torn muscles in the legs or buttocks. With a teacher you can find modifications to make it doable even with these challenges.
Start by placing a blanket on your mat for cushioning and sitting with your legs extended in front of you. Press your heels out and draw your toes towards you. This is Dandasana, or the Staff Pose. Now bend your right leg and cross it over the left knee. Bring the right foot to the outside of your left hip, then bend your left leg and draw it back toward your right hip, stacking your knees one on top of the other.
If this feels like too much, you can modify this part of the pose by keeping your left leg straight or by adding some height under your sitting bones. In the photo I am sitting on a block — the extra height makes the pose easier on the hips and knees.
Now press down through your sit bones and lengthen your spine. Try drawing the muscles just below your navel in and up to engage your core and lift up out of your waist.
Next, the arms. As you take a long slow inhale, reach your right arm out to the side and rotate from the shoulder, pointing your thumb down and palm facing behind you. Exhaling, bend your right elbow and bring the back of your hand to your lower back. Slide your hand up your back along the spine as far up towards your head as it will go.
Reach your left arm up, bend the elbow and drop your hand behind your neck. See if you can slide it down your back and move your hands towards each other. Some people can clasp hands in this pose, but if your hands don’t reach, use a strap or belt, as I am doing in the photo. Hold it in your left hand to begin with and drop it into your right hand.
Lift your chest and tuck your lower ribs in so as not to overarch your back. Keep a long spine. Take several long slow breaths, in and out. To deepen the pose, bend forward. To get out of the pose, release your arms, unwind your legs, and sit in Dandasana again.
Repeat on the other side, inviting the wisdom of Mother Earth to nurture us in the year ahead.
Sitting with a straight spine, the writer begins Kapalabhati, taking a gentle inhalation after vigorous exhalations. (Photo by Ric Ide)
TO THE MAT
Stoking Your Inner Fire for Winter
Kapalabhati breathes energy into mind and body
BY JENNIFER SHANNON DEC 13, 2023
With the shortest day of the year approaching, we feel the cold and dark of winter wrapping around us. There is no better time to harness the power of the breath to illuminate and feed our inner fires.
Pranayama is the term for the breathing techniques developed by the ancient yogis to work with the essential energy — the life force, or prana — of the body. Kapalabhati is one of them. It involves short powerful exhales and gentle inhales. The roots of the word mean “skull lightening,” and doing it you might imagine you are cleaning out the cobwebs and polishing your brain. It is energizing and can lift your emotional state. And it really can warm you up.
The list of benefits of this kind of breathing is long, but there are also several contraindications to consider: you shouldn’t do this if you are pregnant or have digestive or abdominal irritation, a respiratory infection, vertigo or epilepsy, high blood pressure, heart disease, a pacemaker, or glaucoma.
To do this pranayama, begin by sitting comfortably with a long, straight spine. You may sit cross-legged, in a chair, or kneeling, seated on a couple of blocks, as I am in the photo. Begin by practicing some easy, long, slow breaths in and out. Inhale and exhale through the nostrils with your lips sealed.
After a few easy breaths, place one hand on your belly. On your next exhalation, draw in the muscles of the lower abdomen rapidly, creating a quick, strong exhalation; then relax the belly, and your inhalation will happen naturally. It will be a somewhat slower inhale, happening with no effort. Then repeat with another quick exhale by drawing the belly in rapidly. Release it, and feel an easy passive inhale.
This may feel strange. The reason is that it’s the opposite of how we usually breathe, with our inhalations relatively active and our exhalations passive.
If you are having trouble drawing in your lower belly, place both hands on your abdomen, and while you exhale, use your hands to push the belly in. Release your hands on the inhale.
Start out slowly; as you become more adept at contracting and releasing your lower belly you can speed up the pace. Try 20 to 25 breaths at first. Afterwards notice your inner landscape. Do you feel the breath’s warming power? You may gradually increase the number of cycles of Kapalabhati as you get more comfortable with it. Experienced yogis do up to a hundred cycles at a time — but that’s not recommended for beginners.
The ancient yogis theorized that the universe is made up of both energy, prana, and awareness, chita. They believed that when both flow freely through the body we experience good physical health, inner peace, clarity of mind, and spiritual awakening. They developed eight systems of practice to enhance their flow, and these are now referred to as the eight “limbs” of yoga. Most students I work with are familiar with asana, the yoga postures; that’s just one limb. Pranayama, or breath work, is another limb. I’ll leave the other six for another time.
Although it is enough for some people to know that pranayama is rooted in ancient philosophy, I know others who would rather hear that there’s plenty of modern-day scientific research pointing to the effectiveness of breath techniques for reducing stress and improving mental acuity and sleep. For those seeking western culture’s view, I recommend “Research: Why Breathing Is So Effective at Reducing Stress,” an article published in the Harvard Business Review in September 2020.
Whatever inspires you, I hope that by stoking your inner fires you’ll stay warm and bright through this holiday season.

TO THE MAT
Stretching Toward Inner Peace
Let your mind follow your body into Uttanasana
BY JENNIFER SHANNON NOV 8, 2023
The world feels unsteady these days. At times like this, I lean on my regular yoga practice for help finding equilibrium and grounding. It works by connecting body and mind. Our bodies are always in the present moment; sensing that can steady the mind.
Uttanasana — the standing forward bend — is good to do after sitting for a long time or at the beginning of a yoga practice. Besides that, it will stretch out your legs and spine; and it is a calming pose, good for stopping a busy mind and keeping it from racing back to the past or into the future.
This pose stretches the calves, hamstrings, lower back, spine, and neck.
But because the pose puts your head below your heart, it is not recommended if you have glaucoma, retinal problems, or untreated high blood pressure.
Start by standing on a yoga mat, or, as you see in the photo, firm ground outdoors. First, step your feet hip-width apart, then interlace your fingers behind you and lift your hands off your back as high up as is comfortable. Roll your shoulder blades down your back and lift your sternum. You want a sense of opening in the chest and shoulders. But gently: you do not want sharp pain, numbness, or an electrical sensation.
In that open position, take a long slow breath in and out. Then release your arms to your sides, keeping your chest and shoulders open.
Now, hinging at the hip joints, begin the forward bend, bringing your hands to the floor or to a chair, or fold your elbows and feel the weight of your arms guide you as you extend down. You may need to bend your knees.
Press into your feet, distributing your weight evenly across the balls of the feet and the four corners of the heels. Lift the muscles just above the knee and pretend you are squeezing a ball between your thighs to activate your inner legs.
Imagine your torso is like a wet towel hanging from your hips down your back and through your neck and head. Continue to breathe and relax where you can.
You are working toward straightening your legs, but rather than just shooting the knees back, try slowly opening the back of the knees. Imagine you are widening them across from side to side and lengthening them from top to bottom. Lift your sit bones towards the sky as you press your feet into the floor. Take several breaths here.
When you are ready to come up, place your hands on your hips and engage your core to come up to standing. If your back feels stiff or achy, place your hands on your thighs to help support yourself coming up.
Uttanasana may be familiar to you as a stretching pose, but I invite you to let go of any preconceived notions or experiences and approach it with “beginners mind,” as if this were the first time you were doing it.
In yoga, we bring extra awareness and attention to details in our bodies as we assume the shape of the pose. That, combined with conscious breathing, is key to its power to calm us. And when we pay attention to the sensations, we can also step back from the stories we tell ourselves — stories like “I can’t stretch” or “this is too hard; why bother?”
A yoga practice allows us to do what we can do without hurting ourselves or getting discouraged. You start where you are and do a little every day, watching your body open up.
Remember, “a journey of a thousand miles begins with a single step.” The Chinese proverb said to be the wisdom of Lao Tzu seems apt for thinking about this pose and for this moment in time, when the journey toward peace seems long.

Keeping your back straight, and with a tiny bend in your knees, fold forward from the hips into Padottanasana. (Photos by Ric Ide)
TO THE MAT
With Fall’s Arrival, There’s Reconnection

Deeper in the pose, you can rest your head on the floor, but if it seems too far away, bring support from blocks (or a stack of books).
Find your place in the cosmos again, or at least within your own body
BY JENNIFER SHANNON OCT 18, 2023
I think of this newly becalmed time of year as right for reconnecting — with ourselves and with the world around us. And I turn to yoga for this. The practice of yoga is meant to connect us more deeply to ourselves as well as nature and beyond. The term “yoga” comes from the Sanskrit word yuj, which means to join.
There is a particular pose, a forward bend done with the legs planted wide apart, that I find encourages reconnection: Prasarita Padottanasana. As you practice this pose, you may have an experience of the interconnectedness of everything, at least within your body if not in the whole cosmos.
It helps that this pose engages the whole body. It strengthens the legs and feet. It also stretches your ankles, calves, hamstrings, groin, buttocks, and lower back. At the same time that it energizes the body, it calms the mind.
Prasarita Padottanasana is also an inversion, which can be energizing, but because it increases blood flow to the head, it is not advisable for people with uncontrolled high blood pressure or glaucoma or anyone who has had a detached retina.
Before starting the pose, imagine your body is like a Calder mobile: you touch one end and everything else smoothly moves in concert. Think of this standing wide-legged forward bend as allowing your interconnected parts to move freely.
To get in the pose, stand in the middle of your yoga mat or on a surface where you won’t slip. Begin in Mountain pose, feet parallel and hip-width apart. Take a breath, place your hands on your hips, and step your feet three to four feet apart as you exhale. You can experiment with the distance between your feet. You want your stance to be wide but to avoid straining the hip joints.
Bring your awareness to your feet. Lift and press into the balls of the feet, under your big toes and into your heels. Then press the outside edges of your feet into the ground, your feet fully engaged. Next, draw the muscles three inches below your navel in and up slightly and knit the ribs in to engage your core. Draw your tailbone down.
Notice that all of these are subtle actions. You should still be able to breathe comfortably. Take a moment to reach your arms over your head and lift out of your waist, lengthening the sides of your body.
To fold forward, put your hands in your hip creases (where your thighs meet your hips). Engage and lift your thighs and at the same time allow a tiny bend in your knees. Keep your back straight as you fold forward from the hips.
Reach your hands to the floor, shoulder width apart, arms straight. Be careful to come forward from the hip joints, not by rounding your lower back — that will strain your back. If you have trouble reaching the floor with your hands, yoga has a good solution for that: bring the floor higher up. You can do that by placing a chair in front of you so you’re placing your hands on the seat instead of on the floor. Make sure the chair is not going to slip as you lean into it.
You may also need to bend your knees more. Tight hamstrings can make it difficult to keep your legs straight as you come forward. In any case, don’t lock your knees.
From here, if you’d like to take the pose deeper, you may bend the spine to bring your head towards the floor and walk your hands back, keeping your elbows bent. If your head reaches the floor, gently rest the crown of your head on it. Otherwise let your head hang or put a block or some stacked books under it at the crown for support.
Hold the pose for three to five breaths. To come out of it, walk your hands forward and straighten your arms. From here, bring your hands to your hip creases and, pressing down into the thighs, come up with a flat back.
Step your feet closer together and return to the Mountain pose, then bring the palms of the hands together in prayer pose at the center of your chest. Take a moment to notice your experience. What is the imprint of this pose? Take a walk around your mat and continue to notice how your body feels. How is your mood?
As you travel through your day, notice if aftereffects of reconnecting — feelings of balance in your body and clear-headedness — stay with you.

Finding a drishti point to focus on in front of you will help you settle into the Tree Pose. (Photos by Ric Ide)
TO THE MAT
Taking Root in the Tree Pose
Getting grounded before the busy season, in body and mind
BY JENNIFER SHANNON MAY 24, 2023
If you are anything like me, you suddenly have many things you want to do — too many things. As summer begins, it is easy to become scattered. This is when I turn to my yoga practice for a pose that is grounding and settling. Tree Pose, Vrksasana, is particularly good for this. “Vrksa” means tree in Sanskrit, and I take the fact that there’s a pose named for it as a comfort: even in ancient India, long before cell phones and social media, people needed help getting grounded.
Start by standing with your hands in the gesture of prayer, anjali mudra, pressing your palms together in the center of your chest. One of many rituals of yoga, this one has the meaning of offering and often accompanies greetings and goodbyes. It is one you might see as way to return to your heart, to get yourself composed.
I like to do the Tree Pose on the bare floor, as I find it easier to balance there, rather than on a yoga mat, which has a little give. With your hands in the prayer pose, bring your awareness to your feet. Feel them making contact with the floor. Shift your weight into your right side and imagine you are growing roots down into the ground.

Raising your arms in a wide “V” makes the Tree Pose a little more challenging.
Now that you’re rooted on that side, begin to lift your left foot off the floor. Keep the right leg straight but don’t lock your knee; keep a subtle bend to it. Bring the sole of your left foot into the thigh of your right leg. Press the foot into the thigh and the thigh into the foot. Draw your navel into your spine and tuck your lower ribs in slightly. This helps to engage your core.
In this pose, you strengthen the core and legs. And you open the hips. It is, of course, also a challenging balance pose. It might help to stand near a wall so you can reach out and give yourself some extra support when needed. Or you could allow your knee or glutes to touch the wall.
If you are unable to bring your left leg all the way up to your thigh, you may modify the pose by placing your foot against the right calf or even against the ankle, with the toes and ball of the foot touching the floor, like a tripod or a kickstand. Just don’t place the foot against the knee, as that would put undue stress on the joint.
You may wobble; you may get frustrated. Have patience and a sense of humor. Be your own best friend as you do this, kind and encouraging.
Once in the pose, focus on a point on the floor in front of you. This is called a drishti point. Having a point to concentrate on helps to fix your attention. In this pose, I like to think of creating a third leg extending out through my eyes to the floor, helping to stabilize me.
Hold the pose for five to ten breaths, then lower the left foot and repeat on the other side.
If you would like to challenge yourself more, try lifting your arms up, either keeping the palms together or moving the arms apart in a wide “V” shape. Arms should be straight, so it is easier to do this with the arms apart. Make sure you keep your shoulders down, not hiked up near your ears. To make the pose even more challenging, try closing your eyes.
Whatever you do, let yourself have fun with it. You are challenging your proprioceptive system. This is how the body senses your movements and location in space and how you keep your balance. Sensory receptors in our joints, muscles, and skin work together to build body awareness. By practicing balance regularly, you help to strengthen and maintain this vital function.
This pose reminds me of what I love about yoga, something I hope will be part of a beautiful summer, which is that yoga works the whole person and so many aspects of what it is to be human. A simple pose like tree pose strengthens and opens the body. It increases our stability physically, emotionally, mentally, and if you will, spiritually.

After squaring your hips, raise your arms and get long through the spine from your tailbone to the crown of your head. (Photos by Ric Ide)
TO THE MAT
Parighasana Opens the Gate to Your Inner Landscape
Resting afterwards, imagine the spring garden you’ve cultivated there
BY JENNIFER SHANNON APR 26, 2023
I love this time of year. It seems so full of possibility and promise. There is a new energy in the air, and practicing Parighasana or Gate Pose is a way to usher it in.
The word Parigha refers to “the gate of the Palace.” I like to think of this pose as a gate to one’s own inner palace or inner landscape — that place where we cultivate new energy and new possibilities for ourselves. Gate Pose
Start by kneeling on a yoga mat. Place a folded blanket under your knees to add cushioning and protection. If you have had a recent knee replacement or your knee is too sensitive to kneel, you may do this pose standing.

Exhale into a stretch for your side body. The movement can be small: yoga isn’t a competitive sport.
Move into the pose by extending your right leg out to the side and placing your heel on the ground, flexing the toes up toward the sky. Place your right hand in the right hip crease, where the thigh meets the hip, and press the hip down so it is more or less even with your left hip. We call this “squaring the hips” in the yoga world. Raise your arms overhead, palms facing each other.
If you are having trouble balancing, you could try moving the right foot against the wall for support or plant it on the ground.
Get long through the spine from your tailbone to the crown of your head. Lift out of your waist, draw your navel into the spine, and gently tuck your lower ribs in. These are subtle movements meant to engage the core and stabilize the pose.
Take a breath in and as you exhale lower the right arm to the right leg. Extend your left arm and torso to the right. Here you are creating a stretch for your side body. If you have back sensitivity, be careful how far you bend. There is no need to push yourself into an extreme position. Remember, yoga is not a competitive sport. Also, if you have uncontrolled high blood pressure, you may want to keep the torso vertical.
You can stay with the side bend for a few breaths or longer if it feels right. Then slowly come back to center, release the arms down, and draw the right knee in. Take a moment to notice the imprint of the pose. You might notice tingling, heat, or something else. Some people say they don’t notice anything. If that is the case for you, it may help to realize that over time, as you deepen your yoga practice, you may become more aware of sensations and more attuned to your inner landscape.
Now switch sides. Extend the left leg, put your left hand to left hip crease, square the hips, and reach the arms overhead. Bend to the left. Hold for a few breaths or longer, doing what feels right for your body.
To come out of the pose, come to kneeling and then find your way onto your back to rest. Have your legs extended or knees bent with your feet on the floor, arms relaxed at your sides. Soak in the many benefits of Gate Pose: it strengthens your core, opens and stretches the side body, and stimulates your lungs and abdominal organs. Think about the pose clearing your mind and relieving stress.
As you lie on the floor resting, imagine you have walked through a gate into a beautiful spring garden. Take time to tune in and appreciate what you have cultivated there.

The Dragon Pose comes from the yin yoga tradition. It is intense while being held, but with its release comes new energy. (Photos by Nancy Bloom)
TO THE MAT
Spring Back With the Dragon Pose
A quiet approach to holding, then feeling, new energy
BY JENNIFER SHANNON MAR 22, 2023
March is a lonely, windy month on the Outer Cape. But as it unfolds, we feel the good it brings. The days grow longer and the light brighter. Gradually we find new energy and the inspiration to move.

In the long lunge of the Dragon Pose, you can ease up by resting your hands on blocks.
One of my favorite yoga poses for releasing all that we’ve seemingly stored up through the winter is Dragon Pose. This pose comes from the yin yoga tradition in which one settles into a pose, with support, and holds it for long periods of time. It might seem counterintuitive to hold a pose for a long time to get your energy going. But this quiet way of holding brings circulation to our deeper tissues. Afterwards, you will feel refreshed by it.
To get into Dragon Pose, start on all fours in a tabletop position on the floor or a mat. You will want some cushioning under your knees — you don’t want to feel knee pain in this pose. Step your left foot forward into a lunge. The left knee will be over your left ankle. Now slide your right knee back until you feel a nice stretch in the right hip and thigh. Make sure you’re not resting directly on top of your kneecap but slightly beyond it (towards the bottom of the thigh).
Gently press your front foot into the floor. Allow your hips to move forward until you feel just the appropriate amount of a sensation in the front of your right hip. But how much stretch is appropriate? Yogis call this “finding your edge.” You’ll know you’ve found your edge if you would rate what you feel as a 4 on a pain scale of 1 to 10 — that is, you should feel sensation, but not pain. If you feel sharp pain, electrical sensations, or numbness, back off. Pay attention to your breath. If it is hard to breathe naturally, you are pushing too hard into the pose.
From here, rest your hands or fingertips on the floor. If it’s hard to reach the floor, you may put your hands on blocks on either side of the front foot. To ease up even more, put the blocks inside the left foot.
Now hold the pose for 1 to 3 minutes as the intensity builds. Then come back into tabletop, take a few breaths, and notice the imprint of the pose on that side of your body. Repeat on the other side. When you have done the pose on both sides, take a few moments to lie on your back and notice the effects of the Dragon.
Yin yoga comes from the Taoist tradition and the theory of Chinese medicine. If you have ever had acupuncture, you know it addresses energy meridians that travel up and down your body. The idea is that if the energy is moving smoothly you have more vitality, creativity, and health. Yin yoga is another way of stimulating these energy meridians.
In yin poses, you assume the shape of the pose and then let time and gravity do the work. The deeper tissues, fascia, connective tissues, joints, and bones don’t actually stretch, but they do respond to the gentle tugging or pressure the poses bring to the areas around them.
Doing the Dragon Pose, allow your muscles to be soft, relaxed, and passive. Just use the muscles you need to maintain the shape of the pose. Think of the pose as creating space and circulation in the areas where you feel the stretch.
Yin yoga is sometimes called a bitter practice with sweet results: while we are not entirely comfortable in these poses, we feel a flood of release when we come out of them and often greater ease in movement.

Jennifer Shannon practices Parsvottanasana, the Pyramid Pose or Standing Runner’s Stretch. (Photos by Ric Ide)
TO THE MAT
Happy Hamstrings, Happy Life
Parsvottanasana means stretching your legs for your back, knees, and mind
BY JENNIFER SHANNON FEB 15, 2023
A chair provides support and stability for Parsvottanasana.
February can be a sedentary time of year for many of us. Short days, long nights, and cold weather and wind can keep us indoors and sitting around more. On the other hand, some people find themselves doing activities that they don’t do the rest of the year: skiing, skating, or snowshoeing.
Whether you’ve been a sitter or a skier, you might find that your hamstrings — the group of muscles that run down the back of your legs from the hips to the knees — are tight. And that can cause stiffness and limit your mobility. Lower back pain, bad posture, imbalances in your musculature, or knee pain can often be traced to this same muscle group.
I have just the remedy for this: Parsvottanasana. Also called the Pyramid Pose or Standing Runner’s Stretch, this pose is a deep opener for the hamstrings, and it is not just for runners. It’s a pose that can also lengthen your spine and side body and improve your powers of concentration.
Begin by standing at the far end of your yoga mat or another nonslip surface. Stand with your feet parallel to one another and hip width apart — that is, about four to eight inches apart, depending on your size.
Take a step forward with your right foot, placing it two to three feet ahead of you, depending on the length of your legs and your flexibility. Now check to see if you’re feeling stable. If not, you may need to widen your stance slightly. Put your hands on your hips.
Angle your left foot out slightly and square your hips, so that your hip bones are facing forward. Press into your feet. Feel the muscles of the legs engaging. Do not lock your knees; instead, keep a slight bend in them and lift the muscles in your thigh up and away from your kneecap. From here, bring your awareness to your pubic bone. Lift the pubic bone and tuck the tailbone slightly down towards the floor.
Elongate the spine by lifting out of the waist and staying long all the way to the crown of the head. Take a deep breath in, then, as you exhale, lift the tailbone and hinge forward from your hips. Continue forward until you feel a good stretch in your hamstrings. Keep your head in line with your spine as you lean forward, then release your forehead gently, being mindful not to strain your neck.
Breathe and notice where you are feeling the pose in your body. Are your hamstrings talking to you? If this is challenging for you, place a chair in front of you and put your hands on either side of the seat to help support your weight and stabilize the pose. Make sure the chair is sturdy and not likely to slide forward — it helps to have all four chair legs securely on your yoga mat.
If you feel like you can go deeper, continue to hinge at the hips, reaching your fingertips to your shin, your foot, or to the floor. Take a few breaths. There is no need to push yourself as deeply as possible. Going to 60 or 70 percent of your range will benefit you sufficiently and guard against overstretching the muscles, which can result in injury.
Stretching should not be painful. Find your edge with just the right amount of sensation, without sharp pain, electrical sensations, or numbness. Then hold that edge for a few breaths.
To release the pose, bring your hands to your leg and come up with a straight spine, using the leg or the chair for support. Relax your body as you stand and notice the imprint of the pose on this side.
If this felt relatively easy to do and you’d like to challenge yourself more, you may want to add the hand and arm variations. You might rest your arms behind your back, hands clasping opposite elbows. You may also leave your hands resting on your sacrum. In an advanced version of the pose, the arms are behind the back, palms pressed into each other in a reverse prayer position — but proceed with caution, as this may put strain on your hands and forearms.
Whether or not you are using the arms, be sure to repeat the pose on the other side. When you have finished the stretch on both sides, notice: was one side tighter than the other? If so, you might want to do that side again.
After practicing Parsvottanasana, consider the sensations in your back and legs. Doing this might not seem natural at first, but body awareness is something to cultivate. It will help you enjoy your yoga practice and avoid injuries. Take a walk around the room and notice what you feel.
Even as you move down in the Chair Pose, keep your chest lifted. Oh, and smile. (Photo by Ric Ide)
TO THE MAT
The Mighty Chair Pose
A strengthening pose that’s like a smile against midwinter’s darkness
BY JENNIFER SHANNON DEC 21, 2022
These short days and long nights of deep December can bring an inner sense of darkness. Psychologists have even given a name to this phenomenon — Seasonal Affective Disorder (SAD). Exercise is a good way to counteract it.
Considering what yoga can offer as an answer to this seasonal malaise, I think the Chair Pose — an energizing, strengthening pose — might be just the ticket for this time of year. The Sanskrit name for it is Utkatasana, meaning “powerful, mighty pose.” It focuses the mind and tones the whole body.
To get into the pose, you begin by standing with your feet hip width apart (4 to 8 inches depending on your size) and with your arms at your sides. Inhale and stretch the arms forward and up. Keep them shoulder width apart or wider so that you can feel a sense of ease and openness in your shoulders.
Once your arms are raised, adjust your shoulders. Roll your shoulder blades down your back and plug your arm bones into your shoulders. If you are having trouble balancing, step your feet wider apart. This pose can be demanding on the shoulders, so you may opt to keep your hands on your hips or in prayer pose at the center of your chest.
Now, keeping your feet planted and arms and upper torso lifted, bend your knees as if you are sitting back on a ledge. You are bending through the ankles, knees, and hips, yet you want your chest to stay lifted. Now is when, if we were in class together, I might say, “Imagine you are raising your heart to the sky.”
Bend your knees only as far as feels comfortable. In this pose, as in all yoga poses, you want to find your edge. This is the place where you can hold the pose without creating sharp pain, electrical sensations, or numbness. You are working the muscles but not overstraining the joints. One other thing about finding your edge: keep breathing as you do it.
In this pose, you will find it is important to use your core to help you hold the pose. To engage your core, try drawing your navel in towards your spine and tucking the lower ribs in. This is meant to be a gentle adjustment. It is effective at bringing your core on board. A strong core will protect your back and help with your alignment in the pose.
To deepen the pose, you may “sit” a little lower by moving the top of your thighs down a bit more. At the same time, keep lifting your torso out of your waist.
If your ankles are tight, you might find it helps to place a rolled mat or towel under your heels. This little lift will give you greater access to sitting back into your legs.
There are other ways to approach this pose — ways that add support, which can boost your confidence and help you feel the effects of the pose better. One that is useful, especially if you have cranky shoulders, is to place your hands on your knees. Another is to practice the pose with your back against a wall.
However you get there, consider this: you are now in the powerful, mighty Chair Pose. Breathe. And continue breathing as you hold the pose for 10 seconds or longer, up to a minute. You are strengthening your legs, back, shoulders, arms, and core.
Try smiling while you do the pose and imagine that smiling energy passing down through the chest and into every tissue and every cell of the body. Invite a feeling of unconditional friendliness to whatever is there for you.
The winter solstice is meant to be a time of drawing inward for reflection, as well as a time of celebrating the return of the light. We are regrouping for a new year, for new challenges and new adventures. We are celebrating being alive and having the strength to carry on.
May your new year be full of joy and peace.
Jennifer Shannon is a certified Kripalu yoga teacher who lives in Truro.
This breathing technique is traditionally done with the right hand in Vishnu Mudra, covering first one nostril then the other. But you can also just imagine directing the breath instead. (Photo by Ric Ide)
TO THE MAT
The Energy-Balancing Effects of Nadi Shodhana Pranayama
Take a deep breath (in one nostril and out the other) for the holidays
BY JENNIFER SHANNON NOV 22, 2022
Both the ancient yogis and modern-day psychologists know the power of the breath in calming the body and clearing the mind — something many of us need as we head into the holiday season.
In my previous career as a psychotherapist, I taught a breath technique from yoga to my clients to help with anxiety and depression. Now, as a yoga teacher, I teach it at the beginning of my classes as a way to help people arrive fully and settle in.
I am just back from a 10-day retreat at Kripalu, in Western Massachusetts, where we delved deeply into the yogic breath work called Pranayama, which was developed to unblock and balance energy. Some breaths are calming, others are stimulating.
The ancient yogis believed that energy travels through channels known as nadis in the “subtle body” — a complex idea, but essentially one that melds mind and spirit. They called this energy prana, or life force.
It made sense even then that energy in the body can be blocked by physical or psychological factors such as injury, stress, or trauma, leading to problems in the body, mind, and spirit. Controlled breathing practices have been shown to improve respiratory function, reduce stress levels, improve digestion, improve cardiovascular health, reduce insomnia, improve concentration, boost immunity, and enhance mindfulness.
Nadi shodhana pranayama is an alternate nostril breathing technique meant to nourish your entire being with life force energy by opening the nadis, the channels. Shodhana means “to purify.” It is traditionally practiced first thing in the morning on an empty stomach. A regular morning practice of nadi shodhana will have cumulative effects over time. But it can be used at any time of day when you need to calm yourself and feel centered. Some people like to do it before bed or if they wake up in the middle of the night.
I recommend that, initially, you try it for 30 seconds to a minute and see what effect it has on you. Everyone’s body and nervous systems are different. A little may go a long way for you, or you may find a longer practice more beneficial. Remember, long slow breaths in and out. You are looking for a relaxed feeling.
Avoid this breath work if you have a sinus infection or any upper respiratory infection, asthma, or uncontrolled high blood pressure. It may be difficult to practice if you have a stuffy nose. Before you begin, take a moment to blow your nose and clear the nasal passages.
Begin by sitting in a comfortable position. Lengthen from the tailbone to the crown of the head, lifting out of the waist and creating a nice long spine. Relax your shoulders and feel the seat of your pants on the chair or cushion.
Take a long deep breath in and a long sigh out. This breath is traditionally done with the right hand in Vishnu Mudra (let your left hand rest comfortably in your lap). Mudras are hand gestures thought to enhance the flow of energy. Lift your right hand up, with the palm toward your face. Bend your index finger and middle finger into the palm. Place your thumb on your right nostril blocking the flow of air through that nostril. Take a long full breath in through your left nostril, pause at the end of the inhalation, and remove your thumb from the right nostril. Block your left nostril with the tip of the ring finger and exhale through the right nostril. Breathe in through the right and then place the thumb on the right nostril and breath out through your left. Breathe in left, close the left, breathe out right. Breathe in right, pausing for a beat at the top of the inhale, close the nostril, breathe out left, and so on.
Continue breathing this way for 30 seconds to a minute and notice the effects. You may gradually increase the time to 3 to 6 minutes. Do not hurry the breath; long slow breaths will be more effective. Let your mind focus on the breath.
If you are feeling shortness of breath, it is a sign you are breathing too hard, pushing your breath past its natural limits. Stop if you feel dizzy, lightheaded, or nauseated. Blocking the nostrils makes some people feel claustrophobic or uncomfortable. If it’s like that for you, it is possible to do this breathing exercise without using your hand. Just imagining directing the breath in this right-left balanced way can be quite powerful.
Taking the time to do this simple practice can help you get through months that can be hectic and leave us frazzled. I offer it with the hope you have a calm, cool, collected holiday season.
TO THE MAT
Standing Strong and Breathing Easy in the Mountain Pose
A yoga pose that can steady you and lift your spirits
BY JENNIFER SHANNON OCT 26, 2022
At first glance, Mountain Pose, or Tadasana, as it’s known in Sanskrit, looks simple. One just stands there, right? On closer inspection, there are many things happening in this foundational standing pose.
Its many benefits speak to why it is an important one to practice. Mountain Pose strengthens the legs, feet, buttocks, back, shoulders, arms, and neck. It can also reduce stress and improve breathing.
And it is relatively easy to practice. Alongside all these good things, there are a number of things that can go wrong in Mountain Pose. It is a pose to do with attention to your alignment and posture.

In the Mountain Pose, with your hands extended down and shoulders released. (Photos by Ric Ides)

To begin, stand with your feet hip width apart. This is generally 6 to 8 inches, but another way to check your alignment is to draw an imaginary line from your hip bones down to your ankles: your ankles should be directly below your hip bones. If this is uncomfortable to you or makes it hard to balance, try taking a wider stance.
Press down through your feet, keeping your weight even on the inner and outer edges of both feet. Notice the balls of your feet and press down on their full width, from the big toe mounds to the pinky toes. Then press your heels into the floor and raise the arches.
From here, feel your body extend from the feet up into the legs. Get long through the legs. Contract and lift the muscles above the knees. Draw the tailbone down and your pubic bone up as you draw your navel towards your spine. Make all these adjustments gently, without forcing or straining.
Now, lift your sternum. Get long through the side body. Lift your head up and out from your shoulders. Feel the crown of the head floating up. Check to see if your chin is jutting forward; if so, draw it back slightly so your head is more in line with your spine.
Where are your arms? Start with them extended down by your sides, hands relaxed but alert, palms open, fingers stretching towards the ground.
Take a deep breath in while raising your shoulders to the ears, hold them there and hold your breath to the count of five, then let your breath go and your shoulders drop. Feel the release of tension.
You are there. Gaze ahead and hold the pose — but don’t hold your breath — to the count of 10.
There is a next step in Mountain Pose, as long as you don’t have high blood pressure or a heart condition. (If you do, practice the pose without raising your arms.) Inhale deeply and raise your arms, palms facing each other. Extend them up into a “V” shape, relax your shoulders, and lift from the armpits. Continue to breathe deeply in and out, feeling your breath as it fills and leaves your lungs. Gaze ahead and stay in the pose to a count of 10, breathing naturally.
On an exhalation, turn the palms away from each other and float them down.
Notice how you feel. Has the pose shifted your awareness of any parts of your body? How is your mood?
Mountain Pose can be illuminating because it increases body awareness — the feeling of connection to your body. Some people say it makes them feel more three-dimensional. You may notice different sensations as you adjust into the pose, though, and some people feel numbness or discomfort as they become aware of a particular part of the body. It helps to breathe and be curious about those sensations.
There is room in yoga to adjust your position for comfort. A good teacher can help you make even big adjustments. For example, you could do this pose in a wheelchair or seated, grounding yourself through the sitting bones rather than the feet.
Always be kind to yourself. You are on a journey of befriending your body.
Mountain Pose, in particular, gets me thinking about my feet and how important they are in supporting me through life. They have evolved to hold us up in our uniquely human stance. And they are amazing structures designed to help us reconcile and neutralize all the movements and forces we encounter day to day.
With our less-active lifestyles, however, our feet can get stiff. Yoga poses done barefoot can help to restore the strength and natural intelligence of our feet to better support us. If you find it hard to tell the different parts of your feet what to do, however, don’t worry — this is where being kind to yourself comes in. We build body awareness with intention and attention. The saying “where attention goes, energy flows” applies here. With practice, you will reconnect and become more familiar with your body.
We all need a pose that can help us stay strong and connected with ourselves and to practice using kindness and curiosity to help us stay the course.
Jennifer Shannon is a certified Kripalu yoga teacher who lives in Truro.

Leaning forward in the Butterfly pose to find that just-right stretch to relax into. (Photo by Ric Ide)
TO THE MAT
Summer Is for Butterfly Poses
Yin yoga’s cooling effect on the season’s hot energy
BY JENNIFER SHANNON AUG 24, 2022
Butterfly pose comes from a yoga tradition that is less well known than the one most people are familiar with. It grew out of the Taoist tradition, incorporating Chinese theories of how to cultivate the body’s energy, as opposed to the more active style of hatha yoga, which grew from the Hindu tradition.
A fundamental principle of Taoism is that all things are made up of yin and yang energies. Yang energy is active and hot. It is the sun; it makes things happen. The summer is a very yang time. Yin energy is passive and cool. It is the moon; it allows things to unfold. Yin energy is needed to balance the yang of summer.
The ancient Chinese philosophical texts attributed to Lao Tzu include this observation: “Nature is not in a hurry, yet everything is accomplished.” For me this is an inspiration to balance summer energy with an unhurried practice that is without striving. It is time for the Butterfly pose.
For Butterfly pose, sit on the floor with equal weight in both sitting bones. Bend your knees and place the soles of your feet together. Slide your feet forward (keeping the soles together as you do this); your legs will be folded in such a way as to make a big diamond shape.
The size of the diamond shape depends on what is comfortable for you. Focus on your hips and lower back as you settle into this position. You want some sensation in these areas, but not so much that you feel you can’t relax into it. You don’t want to feel any sharp pain or electric sensations.
Now place your hands on your ankles and lengthen your spine from the tailbone to the crown of your head. Slowly bend forward and down towards your feet. You may allow your head to gently release downward or you may keep it in a more upright position in line with your spine, depending on what is comfortable for your neck.
The distance between your head and your feet in this pose will depend on your flexibility. Listen to the sensations in your body. The object here is to find your edge — that is, the sweet spot where you naturally release into the pose. There is no need to force it.
In yin yoga, we assume the shape of the pose and then relax into it. This is a good time to breathe, relax, feel, watch, and allow.
If you need to give yourself more support to stay with this pose, please do. You can place a blanket under you for a softer place to sit. You can sit up on a cushion, which will take some stress out of the hips. You can support your knees by placing a folded blanket under them. Once you get settled with the support you need, let gravity keep you in the pose, using just enough muscular effort to maintain the shape and letting time do the work. Practice stillness.
You may find it easy to remain in this pose for three to five minutes or you may need to build up to that. These longer held poses allow the deeper tissues of the body to become revitalized. I am referring to the fascia, ligaments, tendons, and joint capsules. These tissues don’t stretch, but they can benefit from the gentle tug or pull that the pose creates.
Everyone has her own level of tolerance for staying in a position like this. If you are new to this type of practice, you may find you can hold the pose for only 30 seconds to a minute. Be gentle with your body.
I know in yoga many of us have some goal in mind. We want to look like a yogi in a magazine or like the person next to us in class, or we just want to follow the teacher’s instructions and hold the pose for three minutes because she says that’s what’s best. Let that go. Yoga is not a competitive sport.
I had a student once say to me that it was very hard for her not to push herself in yoga. She was aware of that feeling and told me, “It’s like I’m trying to win at yoga.” The real win in yoga is finding that just-right place in the pose for your body and appreciating it.
Yin yoga — and the Butterfly pose is just one example — can be a way to practice that, and an antidote to our busy summer lives.
To counter the overstimulation summer offers, swing loosely into a gentle twist. (Photo by Ric Ide)
TO THE MAT
Moving Into Balance for Summer
‘Empty coat sleeves’ is a gentle twist that warms up the body and clears the mind
BY JENNIFER SHANNON JUN 29, 2022
“I am letting go to the right. I am letting go to the left.” These few words coax me along as I swing into a simple standing movement that has become a real go-to for me. It is a warm-up I almost always teach in my classes because it does more than prepare the body for yoga class — it also clears the mind.
To start, stand with your feet apart. Place them wider apart than your hips, which might be anywhere from 10 to 30 inches apart, depending on the length of your legs. You want to feel comfortable and stable.
Soften your knees and let your arms relax like they are “empty coat sleeves” hanging from your shoulders.
Begin to swing the body to the left, turning at the waist and bringing the hips into the turn as you spin onto the ball of the right foot and lift the right heel. Let your arms and hands swing and follow the momentum of the body. Then repeat on the other side. Go back and forth at a pace that feels right for you. It could be gentle and slow one day and a bit faster another. This gives a lovely full body twist.
A lot of people find they have a tendency to hold their arms and hands stiffly, so they don’t release and swing fully. Unclench all that and let your breath follow the movement, breathing in as you twist to one side, breathing out on the other. This is where my “I am letting go” mantra comes in.
Once you feel you are relaxing and your arms are swinging loosely and easily, you can add an energy massage to this movement. Make gentle fists with your hands and allow the hand that swings back to gently tap your lower ribs as it swings. At the same time, allow the front hand to gently tap the top corner of the chest as it swings forward. Now you are stimulating two important meridians (energy channels) in the body. This is a Qigong exercise.
Qigong is an ancient practice, like yoga, to enhance health and spiritual development. It has its origins in China, though, while yoga comes from India. I find the two practices complement each other.
This twist balances the left and right hemispheres of the brain. The two symmetrical sides are responsible for the different ways we process sensory input. Conventional theory has long held that the right brain is associated with creativity, emotion, and abstract thought, while the left hemisphere is associated with being analytical and methodical, which makes the idea of seeking harmonic balance between the two sides appealing.
Recent research is showing that the right-left split is not so exact, and it is becoming clear that complex functions are better explained in terms of networks that may spread across large areas of the brain. All the better to stimulate both sides of it.
Besides, seeking balance in all ways is important at this rich time of year. There is so much to do. And there are so many more people around us. My town, Truro, goes from a population of about 2,400 to some 18,000 during the summer. All of this can be overstimulating at times. My yoga practice helps me to slow down enough to enjoy the moment. The Qigong provides refreshment.
Consider a few adjustments to really settle into the grounded feeling of the Warrior I pose: draw in the lower abdominal muscles, elongate the spine, keep your arms as far apart as needed to keep your elbows straight. And breathe. (Photo by Ric Ide)
TO THE MAT
To Be Fierce, First Be Grounded
A warrior pose balances determination and patience
BY JENNIFER SHANNON JUN 1, 2022
In these times, it seems clear that we need courage and strength as well as a bit of fierceness to carry on. Maybe that is why the Warrior I pose is on my mind. In Sanskrit, it is known as Virabhadrasana I, named for a fierce mythical warrior from Hindu tradition. In this pose, you stand firm, grounded in the legs as you lift the chest and open the heart to whatever you are facing.
To get into the pose, you want to be standing on a firm surface where you can plant your feet and not worry about slipping. It doesn’t have to be a yoga mat — just not a slippery floor. Doing yoga on grass or at the beach is something a lot of people like.
Begin by standing with your feet hip-width apart and arms at your sides, extending down but relaxed. Take several deep, slow, and full breaths to help you relax and focus. Step the right foot forward, about the length of your leg. Keep your hips, pelvis, and upper body facing forward, so the top half of your body is pointed in the same direction as the toes of your right foot.
Now inhale and, as you do, raise your arms forward and up above your head as you bend the right knee so it lines up over the ankle. Press out through the back heel and turn the toes of the back foot forward — this can help with your balance. Both feet should be flat on the floor. If that is difficult, bring the back foot closer to the front one, or place a towel or wedge under your back heel to give it support.
Breathe. Now that you are in the pose, consider a few adjustments that will settle you into it more deeply.
First, pay attention to your core, the abdominal muscles that provide support and stability. Draw the muscles just below your belly button in and slightly up. Tuck your lower ribs in slightly; this helps connect the core and gives you better alignment in the pose. These are gentle movements, and you should still be able to breath easily.
From here, elongate your spine by lifting through the crown of your head and tucking the tailbone ever so slightly as you bring your attention to lifting the pubic bone.
Notice where your arms are. Keep them as far apart as they need to be to keep your elbows straight and shoulders open. Breathe and repeat the pose on the other side.
In yoga, we are always looking to open and keep space in the body wherever we can. There is a way in which this relates to strength. In daily life, most of us develop compensatory strategies for how to move our bodies, but these can end up causing compression and pain. We may recruit muscles from one part of the body to make up for the weak or tight muscles that we should actually be using to move efficiently and without strain. For example, if you have weak abdominal muscles, you may use your back muscles more to bend and twist and support the body. This can put too much stress on the back muscles, leading to pain.
When you assume a pose in yoga, the next step is to pay attention to what it is teaching you about your body. What part of the pose is difficult to do? Where do I have limitations? What is easy? Where do I feel strong?
When I first started to do Virabhadrasana I, I could not get my back heel on the floor, and it was hard for me to balance. For a long time, I did the pose with the heel up. My legs were not very strong, so I did not step my feet far apart. I tended to let my front knee drift in toward the center, which I learned puts strain on the knee joint. For a pose that looked so simple, there was always plenty to notice and shift.
Yet I grew to love this pose for all its strengthening and grounding qualities. Yoga is a great teacher of patience. Change will come.
TO THE MAT
Yoga Twists: Like Spring Cleaning for Your Body
How to breathe your way gently into a pretzel-shaped pose
BY JENNIFER SHANNON MAY 4, 2022
It turns out that our bodies need a spring cleaning just like our homes do. Have you noticed feeling sluggish or stiff as spring comes on? In the winter, we spend more time indoors and probably get less exercise. We eat heavier foods, get less sunshine and fresh air. This all can lead to a sort of heaviness in the body.
Yoga has a fix for this: twisting poses. The seated spinal twist is a fundamental example. It’s a great way to sweep out the body’s cobwebs. (If you have osteoarthritis, however, this twisting of the spine may not be recommended for you. Ask your doctor.)
Classical yoga poses have Sanskrit names that reference their inner meanings and are known as asanas. They may describe the pose’s shape or function; some names recall Indian gods, sages, animals, or birds. The seated spinal twist is called ardha matsyendrasana, “Half Lord of the Fishes Pose.”
To set up for the seated spinal twist, place a mat or blanket down on the floor for some cushioning. Sit cross-legged with your right leg in front. If it is difficult to sit cross-legged, you may keep your left leg straight and cross your right leg over it.
Press down through the seat of your pants to make good contact with the floor. Place your hands on either side of your rib cage and lift it up and away from your hips. Feel yourself getting taller. Lengthen through the center of the top of your head, the crown, and relax your shoulders and jaw.
Now bring the sole of the right foot to the floor outside the left knee. Place your foot flat on the floor. Bring the sole of the left heel to touch the right hip so the left thigh is facing straight out from the torso (see first photo).

The seated spinal twist provides a core and hip stretch but also stimulates the organs. (Photos by Ric Ide)

Don’t force the pose. Take your time. Breathe. Sit with one leg straight out, if need be.
Interlock your hands around your shin and pull your torso upwards. Tuck your lower ribs in slightly and engage your core by drawing the muscles three inches below your navel in and up gently.
Cross the left elbow to the right side of the left knee and rest it there, elbow bent, forearm and hand pointed to the ceiling. Your right hand goes on the floor behind you — or on a block or blanket if your arm doesn’t reach the floor.
Are you breathing?
The first few times I did this pose, it brought to mind memories of people saying that in yoga it seems like you turn your body into a pretzel — this pose does look like one. It felt awkward. I had trouble breathing in the pose and everything felt crunched. It is harder to breath in a twist because your organs are twisted, lungs included.
My wise teacher at the time told me to lengthen through the spine and turn slowly from the waist, then the ribs, the chest, shoulders, the neck, and, last, the head and eyes. I had been racing forward with my head and eyes first and then bringing the rest of the body into the pose. It felt much better to work from the waist up.
I also found it important to relax as I approached the pose. My tendency was to tense my muscles and force my way into it. I found if I relaxed and thought of a wave motion, inhaling while lengthening the spine, exhaling while deepening the twist, I could flow into it with more ease and continue to breath easily. Let the breath be gentle.
Long slow breath in and long slow breath out. The breath is not meant to be forced but should flow comfortably.
After a few breaths on one side, repeat the pose on the other side.
To come out of the pose, move slowly.
As your body makes this wrapping motion around itself, your organs are stimulated. You might imagine them being squeezed like a sponge when you twist it to wring it out, and then released, with fresh new energy coming in. The pose can bring relief from backaches and sluggishness. It can improve digestion and help the spine to be more flexible and the hips more mobile.
It is a pose that can help us re-emerge from winter and begin to feel light again. A pose that’s perfect for May.
Jen Shannon is a Kripalu-certified yoga teacher who lives in Truro.